LinkedIn Sales Navigator is a powerful tool for sales professionals looking to maximize their effectiveness and reach more potential customers. This powerful platform has many features to help you connect with your target clients, identify new opportunities, and build stronger relationships with key decision-makers.

LinkedIn Sales Navigator’s key features include advanced search capabilities, detailed lead generation tools, and customizable reports that help you track your progress and measure the impact of your efforts. Additionally, it offers real-time notifications when important updates are made to the profiles of your leads or existing customers, making it easier than ever to stay on top of critical information.


LinkedIn Sales Navigator is worth considering if you want to take your sales efforts to the next level. With its robust set of tools and insights, it can help you grow your business and close more deals than ever before. So why wait? Sign up for LinkedIn Sales Navigator today!
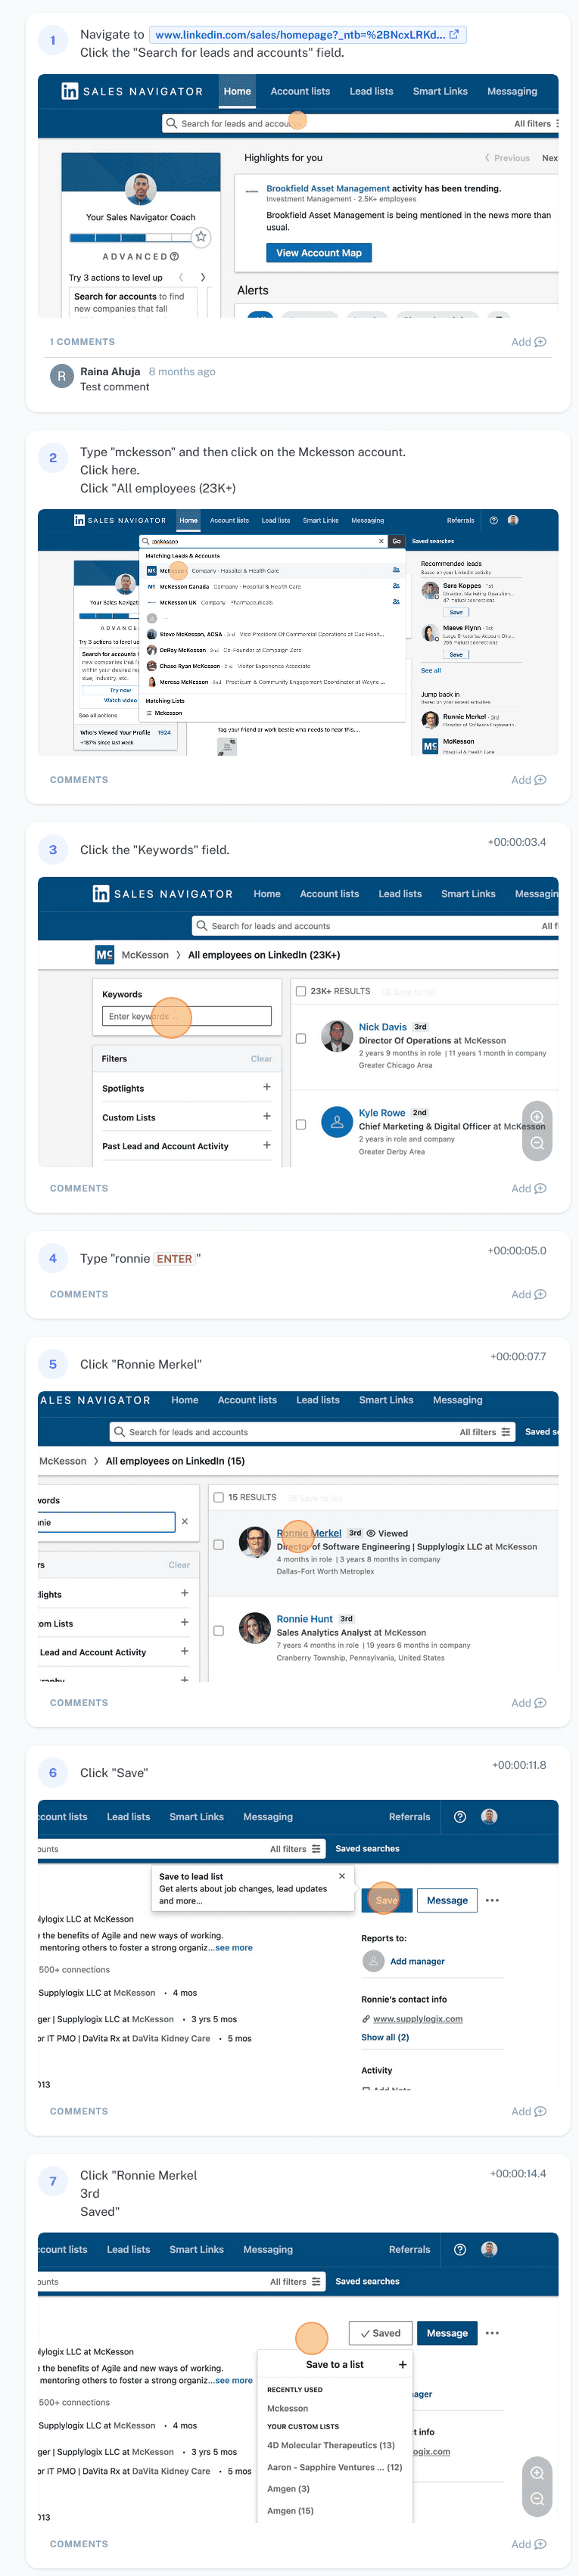
How to Save a Lead in LinkedIn Sales Navigator?
- Go to the LinkedIn Sales Navigator dashboard and log in using your credentials.
- In the top navigation bar, click the “Leads” tab to view all your current leads.
- Click on the lead you want to save in the list. This will open a details panel on the right side of your screen.
- Look for a button or link labeled “Save Lead” or something similar, and click on it to save your lead to the list in LinkedIn Sales Navigator.
- Optionally, you may also want to add additional information about the lead, such as notes or tags, as you save it to help organize and track it more effectively in the future.
- Once you have successfully saved your lead, you can continue to monitor its progress in LinkedIn Sales Navigator or export it for use in other business tools or systems if necessary.
If you want screenshots like this and step-by-step guides for any process, try the free Scribe .
.
So, let us summarize the steps based on the screenshots above:
When using LinkedIn Sales Navigator, one of the essential skills you need to master is saving your leads effectively. This involves adding them to lists to track them and prioritizing your outreach efforts to maximize your chances of closing deals.
To save a lead in LinkedIn Sales Navigator, the first step is to navigate to the lead list where you would like to add the lead. Once there, click on the “Add Lead” button and enter any relevant information about the lead, such as their name, email address, company, or other details that may be relevant to your sales efforts.
Once you have added your lead to the list, it is essential to regularly check in on it and update any additional details as needed. You can also use filters and search functions within LinkedIn Sales Navigator to easily find and sort through your leads and focus your efforts on those most likely to convert into paying customers.
Ultimately, effectively saving leads in LinkedIn Sales Navigator requires a combination of organization and diligence. By staying organized and making regular updates as necessary, you can ensure that you are always prioritizing your sales efforts to maximize results.

Learn more about authors in Nimblefreelancer's team biography page.
- 6 Proven Ways SaaS Founders Actually Get Customers (With Real Examples) - December 17, 2025
- Facebook Ads to Get Followers! - December 27, 2024
- ClickUp vs. Slack - December 20, 2024