Freelancers use Google Sheets as a convenient, flexible, and easy-to-use tool for managing their work. With its intuitive interface, powerful features, and integration with other tools like Google Docs and Google Drive, it is the ideal platform for managing projects, tracking time and expenses, collaborating with others, and more. Whether working with clients or colleagues on various tasks and projects, Google Sheets can help you stay organized and on top of your workload.
When wrapping text in Google Sheets, there are a few key things to remember. First, you must select the cell or range of cells you want to modify. Then, you can use the “wrap text” button on the toolbar to enable text wrapping for your selected cells.
Once text wrapping has been enabled, you may want to adjust the amount of space between your wrapped lines using the “line spacing” feature on the toolbar. This will help ensure that each line is visible and readable while avoiding overcrowded columns or rows of data.


In addition to these basic formatting options, several other tools and techniques can be used to customize your text-wrapped data in Google Sheets further. For example, you may want to apply different fonts or font sizes to other parts of your data or add special effects such as bolding or italicizing certain words or phrases.
If you are looking for more advanced text-wrapping functionality, maybe third-party add-ons are available to help make this process easier and more efficient. Regardless of how you wrap your text in Google Sheets, with some patience and practice, you should be able to create beautifully formatted and organized data quickly and easily.
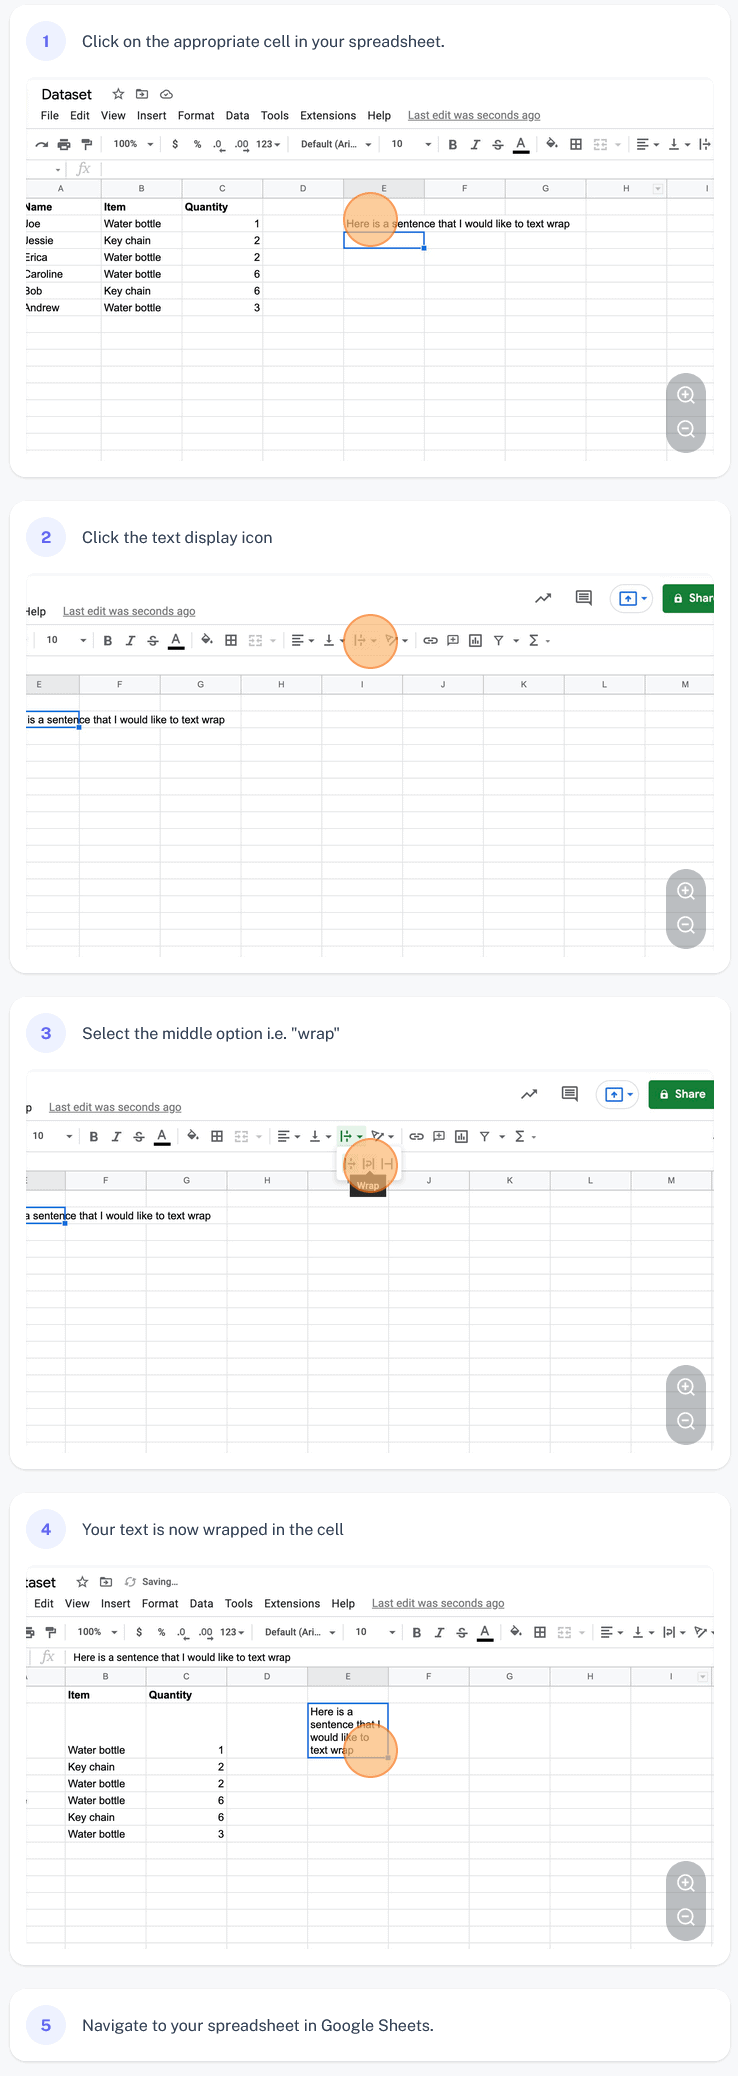
If you want screenshots like this and step-by-step guides for any process, try the free Scribe .
.
How to Wrap Text in Google Sheets?
- Open a new Google Sheet and navigate to the “Format” tab in the toolbar at the top of the screen.
- Next, click on the “Text Wrapping” drop-down menu, which will open a selection of text-wrapping options.
- Select one of these options depending on how you want your text to be wrapped. For example, if you want it to stay within a specific area or column, choose “Wrap text with cell.” If you want it to flow over multiple columns or rows, select “Wrap text outside the cell.”
- Once you have selected your preferred text wrapping option, return to your spreadsheet and begin typing or pasting in your desired text. As you type or paste in new content, this will automatically be wrapped according to your chosen settings.
- If necessary, you can also adjust the positioning and alignment of your text by clicking on the appropriate buttons in the formatting toolbar at the top of the screen. For example, if you need to center your text within a particular cell or set it at a specific level of indentation from other cells around it, use these buttons to make any desired adjustments quickly and easily.
- Once your text is neatly wrapped and positioned according to your preferences, save your spreadsheet as needed and continue using it as usual for all your document creation and editing needs.

Learn more about authors in Nimblefreelancer's team biography page.
- 6 Proven Ways SaaS Founders Actually Get Customers (With Real Examples) - December 17, 2025
- Facebook Ads to Get Followers! - December 27, 2024
- ClickUp vs. Slack - December 20, 2024