For security reasons, you often keep your Excel worksheet as a ‘read-only’ file. Either you intend to prevent data removal by someone else or wish to ensure that the content remains the same while being passed to several persons. Here, the read-only mode proves quite effective as the other parties keep the file content unchangeable yet viewable.
In the last article, we described how to calculate percentiles in Excel . In this one, we will discuss removing “read-only” from Excel.
If you want to learn how to turn off read-only in Excel and simple Excel hacks, please visit the free online Excel course.


But sometimes, you must change the contents of a ‘read-only’ file. How do you modify a ‘read-only’ Excel file? There are multiple ways to undo the read-only mode and enable editing of the file content. You can turn off the ‘read-only’ mode, depending upon the type of Excel sheet and choices present in your system. The standard methods include using the ‘Save As’ option, selecting ‘Edit Anyway,’ entering the requisite password or changing the ‘Properties’ of the file.
Given below are the detailed steps for turning off the ‘read-only’ mode in different ways:
How to remove read-only from Excel?
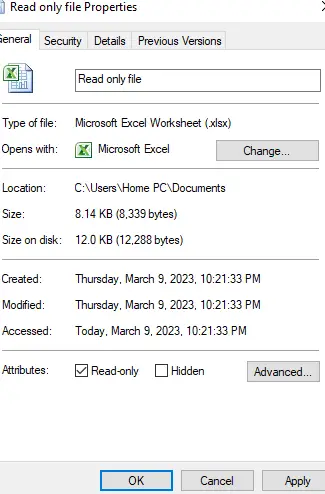
You can remove the “read-only” attribute from the Excel file by following the steps:
- Close the “Read-only” Excel file and remember the file location.
- Find the Excel file, select the file, and press the right button.
- Choose “Properties.”
- In the “General” tab, uncheck the “read-only” attribute (see the image below)
First, you need to locate the Excel file on your computer. Then select it and right-click on it. This will bring up a menu where you should choose “Properties.” Once you click this option, you will see a General tab at the top of the Properties window. Look for a “read-only” checkbox on this page and uncheck it. This will remove the Read-only setting from your Excel file so you can make changes or update your data as needed.
It is important to remember that once you have removed Read-only from your Excel file, anyone with access to the file can edit or update its contents without needing permission from anyone else who may have previously had read-only access rights. For this reason, only those who need access must be permitted to change or alter spreadsheet files containing sensitive information or vital data records.
Removing ‘Read-Only’ from ‘Final’ Marked Excel Files
- Open the ‘Final’ marked Excel file set to read-only mode.
- Click on the “File” tab in the top left corner of the Excel window.
- Choose “Info” from the options on the left-hand side of the screen.
- Click “Protect Workbook” and select “Mark as Final” from the drop-down menu.
- Select “Edit Anyway” to remove the read-only restriction from the file.
- If prompted, enter the password when the file is marked as final.
- Save the changes to the file.
- Close Excel and reopen the file to confirm that the read-only status has been removed.
- If the file is still set to read-only mode, right-click on the file and select “Properties.”
- In the Properties window, uncheck the “Read-only” box and click “OK.”
- Reopen the file to confirm that the read-only status has been removed.
An Excel file is sometimes marked as ‘final,’ which makes it uneditable. In a ‘final’ Excel worksheet, you cannot type, comment, or execute any command on the content. You will find such files marked as ‘final’ via a notification on its top.
Select Edit Anyway’ on the same notification bar to disable the ‘read-only’ status from these files. This will convert the file into an editable mode, and you will make the desired changes.
Remove ‘Read-Only’ from Password-Protected Excel Files
- Open the password-protected Excel file that is set to read-only mode.
- Click on the “File” tab in the top left corner of the Excel window.
- Choose “Save As” from the options on the left-hand side of the screen.
- Select a new location and name for the file, and then click on “Tools” next to the “Save” button.
- Choose “General Options” from the drop-down menu.
- If there is one, delete it from the “Password to open” and “Password to modify” fields.
- Click “OK” to save the changes.
- Close the original password-protected file and then reopen the new file.
- If the file is still set to read-only mode, right-click on the file and select “Properties.”
- In the Properties window, uncheck the “Read-only” box and click “OK.”
- Reopen the file to confirm that the read-only status has been removed.
Some people tend to lock their Excel worksheets with a password. If you attempt to open such a file, you will get a pop-up warning asking you to enter a specific password. The file content cannot be altered without the correct password. Below is the stepwise method to make a file modifiable:

You need to open the newly saved Excel worksheet instead of the previous one for editing.
If you want to delete the password, you must download a third-party application, but this may seem a little devious. A better way is to request the file’s sender to provide you with an editable version of the required Excel worksheet.
Unlocking a ‘Read-Only’ Excel File on Mac
An Excel worksheet is sometimes set to ‘read-only’ via the file’s properties rather than Excel itself. This implies that you cannot access the editable attributes of the file on your operating system. In this case, only the owner has permission to modify the file. So, to change the file content, you will have to unlock the ‘read-only’ file from your system only. Go through these steps to take off ‘read-only’ from an Excel file on Mac:
- Firstly, navigate to the Mac’s Finder and conduct a ‘Search’ for the file you wish to edit.
- Then, choose the particular file and right-click on it. Alternatively, you can navigate to ‘File’ on the top menu of Finder.
- From the right-click or ‘File’ menu, choose ‘Get Info.’ Here, you will see a checkbox named ‘Locked.’ Uncheck this box.
Now, you can open the file to make the desired changes.
Unlocking a ‘Read-Only’ Excel File by Modifying’ Permissions’ on Mac
Sometimes, you may not remove the ‘read-only’ status from an Excel file because of the lack of permission to edit. For example, a Mac computer offers to create a file that allows only the creator/owner and the permitted users to modify it. If so, you cannot change the file contents unless you ask the creator/owner to alter the ‘Permissions.’
Similarly, when you wish to share your worksheet file, you may modify its recipients’ permissions. You can do this via the ‘Sharing and Permissions’ option at the bottom of the ‘Get Info’ part. This part contains the list of your contacts who can view the file. In addition, you will see a drop-down menu displaying the choices; ‘Read Only’ and ‘Read & Write.’ Again, you can set these privileges as per your preference.
Conclusion
By following these tips when making changes or updating content within an Excel Workbook/Spreadsheet File, users should be able to confidently maintain ‘Read Only’ protection over their work while allowing authorized user access where required—thereby ensuring complete control over who has access rights within their particular organization’s workflow systems and processes.

Learn more about authors in Nimblefreelancer's team biography page.
- 6 Proven Ways SaaS Founders Actually Get Customers (With Real Examples) - December 17, 2025
- Facebook Ads to Get Followers! - December 27, 2024
- ClickUp vs. Slack - December 20, 2024