Adobe Software and CS6—or Adobe Smart Grid provide a freemium sound designer. Premiere Pro is used to edit pictures and quickly became an option for amateurs and commercial makers worldwide. When talking about movie and music cuts, there are two kinds of editing processes: linear and unstructured.
Linear word processing was how the video was produced until digital audio recorders and cameras were the primary way to shoot the movie. Then, you would scrutinize the photographs by sliding the paired white subway tile into the program you employed for the type of design. Then, pictures will be selected, arranged, and edited. In these other respects, users would have to “roll” through the entire film to find where they wished to make adjustments and then make the adjustments.
How to Remove Background Noise in Premiere?
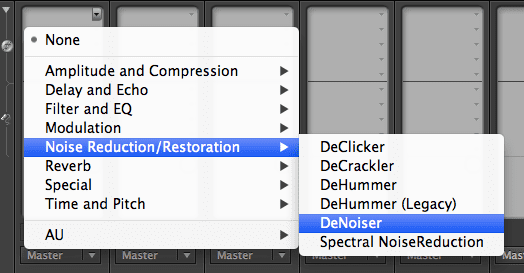
To remove background noise in Premiere, you must activate the DeNoiser option. First, double-click “Audio Effects,” choose the Noise Reduction option, then click the DeNoiser option from the list. In the last step, decrease the amount percentage to zero.


To remove background noise in Premiere Pro in another way, you can do the following steps:
- Select clip
- Go to Window
- Choose Effects
- Choose Obsolete Audio Effects
- Click DeNoiser
- Reduce background noise
Changes have been made to the newest version. Indeed, it might be claimed that the initial version was broken. You may directly navigate to the image you want to alter without nonlinear video processing from the other side. First Pro is a multidimensional editor. You first gather or absorb contents and then slice them into pieces. Clips may be divided, effects and filtered, and frames are cut. Nevertheless, Premiere Pro does not modify the movie version; therefore, we claim it’s not hazardous. The era of digital described in this section to tape cassettes made such a semi-cutting viable.
You would not have to run custom firmware to minimize ambient noise in a movie. You can accomplish this with Adobe Photoshop. Though you have not experienced sound effects, these areas are similar to the visual impacts. Just choose the result you want and put it into your desired clips. A DeNoiser impact includes a wide range of sophisticated audio parameters. Still, you can quickly adjust them and then let your ear decide if it reaches the appropriate level of background sound suppression. To display the Filters Fencer, choose “Display” and click “Options.” Premier Project Access.
You can access the Adverse Affect Control system window by selecting the “Window” and the “Effect Settings” options. At this moment, this would be settings to adjust an effect. Next, click the image files with the sound source and choose “Audio Changes” to get a list of kinds of playback; finally, fivefold on the “DeNoiser” technique to use in chosen clips.
The influence power cable also describes the effect, “DeNoiser,” as well. Choose the “Adjust” option next to “Individual Setup” to display a rock box featuring a “Reduction” and a “Adjust” option. You may choose a number in the range of -20 dB using the Reduction slider. The lesser the value, the Premiere audio will be removed. This variable’s initial value is 0. Select and turn the “Abatement” button on the left to create this value “-10,0dB.” Clicking on the Start Smart key to read a streaming audio recording. You hear less noise when the number of DeNoiser functions you pick drops.


Learn more about authors in Nimblefreelancer's team biography page.
- 6 Proven Ways SaaS Founders Actually Get Customers (With Real Examples) - December 17, 2025
- Facebook Ads to Get Followers! - December 27, 2024
- ClickUp vs. Slack - December 20, 2024