Sometimes, you want to conceal a part of an image before sharing it with your friends, colleagues, or on social media. For example, the image may be a scanned picture of your credit card, an ID, or a screenshot taken on your Mac. Either way, you must blur some of it to conceal unnecessary details or sensitive information.
You can take the free Graphic Design Specialization course if you want to learn the Photoshop Blur Image technique.
What do you use to Blur Images on Mac?
To blur the image in macOS without Photoshop, you can use:


- Pixelmator Pro
- Affinity Photo
- Preview in macOS
- Keynote
- Skitch
- Snagit
Although this kind of work can be effectively carried out in Adobe Photoshop, it is usually time-consuming and entails a lot of effort. Besides, the software cannot be used for free. Nevertheless, four main ways exist to pixelate or blur an image on a Mac without Adobe Photoshop. These include overriding or removing a particular segment of the Preview app or using third-party apps like Snagit or Skitch for blurring and pixelating.
How to Blur Image in Keynote?
To blur images in Keynote, you need to do the following steps:
- Select the image that you want to blur
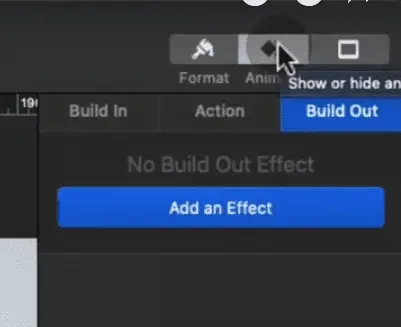
- Click the Animate button in the top right corner of the Keynote app
- Choose Action
- Add Action and choose Opacity
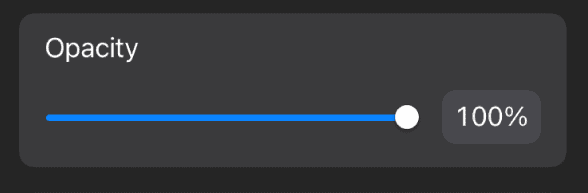
- Opacitylider set level of Opacity Opacityample, 15%).
Let us see the images of how I made the blue image in Keynote.
Use the Animate option in the top corner of Keynote:
Then choose Action and in dropdown choose Opacity:Opacityy, set the opacity level (10%-15%).
Blur image using Overriding in Preview
Preview is a default app in macOS. It is made for viewing PDF files and images on Mac. You may open an image in Preview by right-clicking on it or selecting ‘Open with’ and choosing ‘Preview.’ Alternatively, you may double-click on the picture, which will open the app.
Suppose you want to remove the last few digits from the image of your bank card.
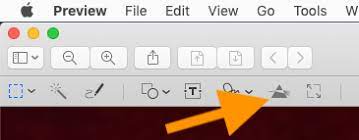
So, the first way to cover the unwanted digits is to override that section of the picture in Preview. Once your image is in the Preview app, go to the ‘Tools’ on the Menu bar and select ‘Annotate.’ Here, choose the option ‘Rectangle.’ A rectangular shape will be added. You can change its dimensions to hide the area of those specific digits. You can also alter the color of the overridden part.
Blur image using Removal in Preview
Similar to the above method, first, you need to open the image in the Preview app. Do so by double-clicking on the picture, using the ‘Open with’ option, and choosing the app. Then, move the cursor to click and drag the area that includes the particular digits you wish to mask. Now, press the ‘Delete’ key on your keyboard. This will remove the chosen part.

Blur image using Using Snagit
Snagit is a software program for taking and editing screenshots. Originally designed for Windows only, it is now available for MacOS as well.
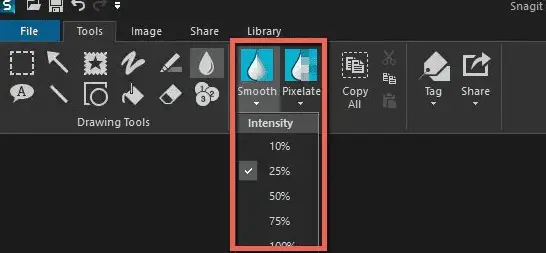
After installing the program on your system, open its app and drag your image to its central panel. Now, press the icon ‘More’ and select ‘Blur.’ After that, navigate your cursor to the part you want to remove and designate that area. This will blur the required portion. Snagit also extends the option of adjusting the level of blurriness. So, you can pick the blurring shade by sliding the ‘level’ bar in the app.
Snagit is not entirely free. However, you can use its free version for 15 days without any functionalities limit. After the trial period, you must pay a certain amount to keep the Snagit app on your system.
Blur image using Using Skitch
Skitch is another app used to capture screenshots and effectively annotate images. It is a free app created by Evernote and is much more efficient than the Preview app. One fantastic feature of Skitch is its ability to pixelate a picture. You must first install the app from the Mac App Store or Evernote’s official site to use it.
![]()
After installing Skitch, open the app and go to the ‘File’ menu. Open and load your required image, or drag and drop it into the app’s zone. Once the image has completely loaded, click the ‘Pixelate’ icon on the left panel. Now, choose the digit area you want to hide and then release. The unneeded digits will be blurred.
How to pixelate an image on a Mac?
To pixelate an image on Mac, please use the free software GIMP, open the image, select the image, and then go to “Filters > Blur > Pixelise” from the menu. In GIMP, you can increase or decrease the pixelation effect by changing the Block weight and Block weight values from the Pixelise box. Finally, select OK to apply pixelization.
Deciding which method to blur or pixelate the image is often tricky. Below are some tips to help you determine which way is best for you:
- Mac Preview is a great option for editing images, especially if you want to avoid downloading third-party apps. However, the edited image’s quality is relatively lower owing to the overridden or removed part.
- Pixelating the image in Skitch makes it look professional and high-quality even after the modification.
- Snagit is more powerful than Skitch, both in terms of editing and screen capturing. However, the app’s free version is only available for a few weeks.
Ultimately, your choice of method depends upon your preferences and needs. However, altering the image in any of the above apps is pretty simple and takes less than a few minutes. Further, irrespective of the blurring or pixelating technique you select, always remember to save the edited image after the required operations.


Learn more about authors in Nimblefreelancer's team biography page.
- 6 Proven Ways SaaS Founders Actually Get Customers (With Real Examples) - December 17, 2025
- Facebook Ads to Get Followers! - December 27, 2024
- ClickUp vs. Slack - December 20, 2024