The ability to quickly and screen record your iPhone is essential whether you’re attempting to illustrate a problem to an IT support representative or demonstrate an iPhone task to your coworkers. With the introduction of iOS 14 in 2020, Apple has made it easy to accomplish that.
In the previous articles, we learned how to find iPhones without the cloud and empty trash on iPhones, and we showed iPhone time machine backup. Look at this guide to learn how to utilize the iPhone’s built-in screen-recording capability quickly and efficiently.
How to ScRecordecord on iPhone?
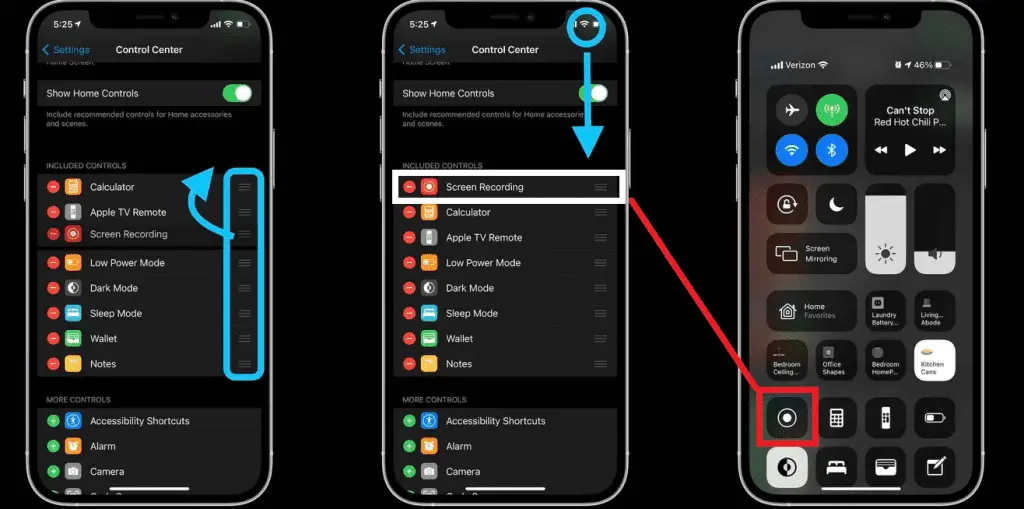
To scRecordecord on an iPhone, you must first activate the “Screen Recording” option in Settings/Control Center/Customize Controls. After that, the screen recording option will be in your Control Center, and you need to tap when you want to record the iPhone screen.


- Any iPhone running iOS 14.0 or later is required.
- Less than a minute is the estimated time.
First, you need to go to iPhone Settings:

- Take a look at “Control Center” in your Settings app.
In 2020, Apple introduced a simple method to record your screen, but you’ll need to activate it first. Open the Settings app and look for the Control Center option (as seen above in the red rectangle).
- Enhance your Control Center by adding a Screen Recording button.
Toggle between the “Included Controls” section, which contains all the choices already added to your Control Center, and “More Controls,” which displays additional controls.
Depending on how many active controls you have, you may have to scroll down a little to view this. Find Screen Recording (as seen in the red rectangle above) and press the green Plus button to its left in the More Controls area. You will add included controls and enable Control Center access.
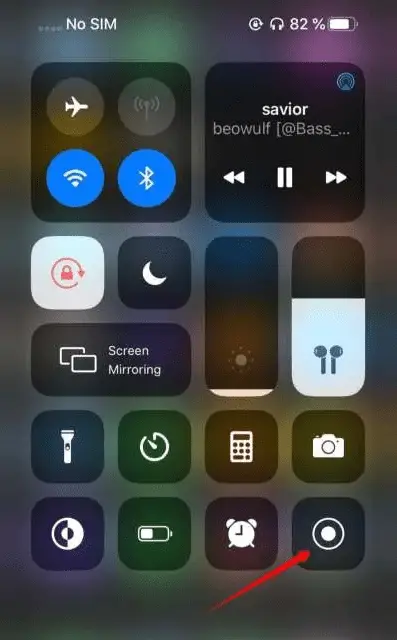
- You may access the Control Center by opening it.
Your next stop will be the Control Center. You may do this on the iPhone’s home screen or in most applications. On iPhones without a physical button, swipe down from the top-right corner of the screen to reach the Home Button.
Swiping up from the bottom of the screen on an iPhone with a physical Home Button gives you access to this feature. To find the button that looks like a solid circle within a hollow circle, open the menu and browse your selections until you find the one outlined in red above.
- Activate the screen-recording function.
Press Screen Recording to begin. This begins a 3-second countdown. When finished, playback will start. Before the video capture begins, use the countdown to dismiss the Control Center and return to your Screen Recording.
When recording, the Control Center’s Screen Recording button will become white and red, and a red signal will appear on the screen’s clock (as seen below).

- Make a record
At this point, you should finish the screen recording. After recording, you may proceed to the next stage.
- You should finish your recording now.
You may stop recording in two ways. Start by touching the top left red timer. You’ll see the above dialogue box. To stop recording, tap “Stop.” To record a full-screen application that hides the clock, open Control Center and click Screen Recording again. Using the second method, the recording ends immediately without confirmation.
You will store it in Photos this time, regardless of how you captured it. iPhone videos may be played in the Photos app, shared, and altered like any other video.
An iPhone user’s guide to screen-recording with audio.
Additionally, you may record yourself speaking while taking a screenshot using the iPhone’s built-in microphone. Before hitting “Record,” take these extra steps to activate your microphone.
- Hold down the Record push-button for a few seconds.
- To begin recording, press and hold the microphone symbol at the end of a pop-up screen, then touch the Start Recording button. The countdown will begin.
- Press the back button twice to quit the display and dismiss the Control Center.
- After this, whenever you start recording, you will activate the microphone. You may switch off your microphone by pressing and holding the microphone icon.
You’ll learn how to open and modify a screen recording here.
Then, you’ll want to view and tweak it. You may locate it on your iPhone’s camera roll in the Photos app. Several editing options are available on the iPhone, including the ability to apply filters and cut the start or end of your footage.
- The Photos app opens the album and chooses the video from the list.
- You’ll see a new window with a drop-down menu as soon as you’ve tapped Edit.
- You’ll see a visible schedule of the video at the bottom of the screen. Tap and drag the arrow next to the Play control to the right to cut the movie’s beginning. The golden color is expected. Tap and drag the left arrow to shorten the end.
- To see the updated version, click the Play button. Just tweak the arrows till you’re happy.
- You may use the same controls to control a picture in the Shots application to change the filters.
- Tap Done > Save as Fresh Clip when ready to save your altered video.
FAQs
- What exactly is recorded by the Screen Recording app?
While recording, it records everything that happens on your iPhone’s screen and every sound it makes. Full-screen movies and music that you play on websites or applications are included in this category.
- Is it possible to add a voiceover to my recorded videos?
As far as we know, the iPhone’s screen capture function does not allow you to record narration or any other input from your cameras while in use. Free third-party solutions that you can download from Apple’s App Store do, however, enable things like narration, an integrated face cam or back camera stream, and other features. Three of our favorites have been included in the list below: TechSmith Capture is a simple screen recorder that works virtually, similar to the built-in method, which uses the iPhone’s built-in microphones.
RecordIt! – A more advanced option that enables post-capture editing and real-time narration. You may record your screen and face with the built-in face cam.
This alternative to RecordIt is Screen Recorder+; startup time is ideal for those on-the-fly screenshots.
- How can I share the video I’ve recorded?
You may share screen recordings, films, and photographs taken with your iPhone’s camera. You may also exchange media through Messages, email, AirDrop, and any other third-party app that allows you to do so.
A screen recording of a lengthy session may surpass the size restriction of specific applications, notably email and messaging programs that do not use Apple’s iMessage framework.


Learn more about authors in Nimblefreelancer's team biography page.
- 6 Proven Ways SaaS Founders Actually Get Customers (With Real Examples) - December 17, 2025
- Facebook Ads to Get Followers! - December 27, 2024
- ClickUp vs. Slack - December 20, 2024