Choosing a suitable option has everything to do with the desired outcomes, especially regarding devices dealing with home security. The appropriate choice will determine peak efficiency and understanding regarding the infrastructure mounting process. Numerous smart gadgets offer an assorted number of varieties that are either hardwired or battery-operated.
Although some owners prefer the traditional installation system, which is undoubtedly time-consuming and full of hassle, the functionality of both kinds of devices is more or less the same. Innovative gadget manufacturers such as Ring and Nest offer consumer satisfaction by installing conventionally or wirelessly. Before purchasing the Nest, it is imperative to determine which one suits your needs. If you want a hardwired Nest or battery-based device, both categories can be installed easily with or without professional help.


Installing a Nest Doorbell is an easy and convenient way to keep your home secure. This innovative product from Nest provides video security and motion-activated alerts, giving you peace of mind that your home is always protected. Here’s what you need to know before getting started with the installation.
Does Nest Hello have a battery, or is it just hardwired?
Nest Hello must be hardwired because it is not manufactured with a battery option. Homeowners must have a wired doorbell mustered to wire a house for doorbell compatibility if they want to install Nest.
Before you start:
- Ensure that your existing doorbell is compatible with the Nest Doorbell.
- Ensure you have the following tools: drill, screwdriver, pliers, wire stripper, level, and ladder.
- Ensure your Wi-Fi network is working and your phone or tablet is connected.
To install a Nest doorbell, you will need a Bubble level, Phillips-head screwdriver, Power drill, Smartphone or tablet, Stepladder, and Wire stripper/cutter. In the first step, you need to check compatibility because a wireless chime with batteries and NO wires is NOT Compatible with Google Nest Hello unless you purchase a power adapter. Next, you must check the transformation voltage because the Google Nest Hello doorbell requires transformer voltage between 16 and 24 volts AC. Finally, you can install the Nestle app and follow the Nest Hello installation step-by-step with detailed instructions.
How to install the Nest doorbell?
- Turn off the power to your existing doorbell at the circuit breaker.
- Remove the existing doorbell by loosening the screws that hold it in place.
- Use a wire stripper to remove about 1/4 inch of insulation from the wires attached to the old doorbell.
- If necessary, use pliers to straighten out any bent wires.
- Connect the wires to the Nest Doorbell according to the instructions provided.
- Use the provided mounting bracket to attach the Nest Doorbell to the wall.
- Use the built-in level to ensure the Nest Doorbell is straight if needed.
- Insert the battery into the Nest Doorbell and power it on.
- Download the Nest app and follow the instructions to connect the Nest Doorbell to your Wi-Fi network.
- Customize the settings in the Nest app to suit your preferences.
- Turn the power back on at the circuit breaker.
- Test the Nest Doorbell to make sure it is working correctly.
- Enjoy your new Nest Doorbell and the added security it provides.
First, it’s essential to understand the different parts of the Nest doorbell. There are three main components: the chime box, the power adaptor, and the faceplate. The chime box is a small device that connects to your existing doorbell wires to connect your doorbell and your Wi-Fi network. The power adapter plugs into an outlet near the doorbell and provides power for the doorbell itself. At the same time, the faceplate acts as a protective barrier between the outside world and the home’s wiring.
To begin the installation, shut off power to your existing doorbell at your circuit breaker panel or fuse box. Then remove any current doorbell button or cover plate from its mounting screws on either side of the entryway. Once these have been removed, please take note of any exposed wires inside so you can properly connect them to their corresponding terminals on the chime box later in this process.
Please see the video:
Next, mount the chime box near where you removed your old doorbell hardware using screws or double-sided tape, depending on what material makes up your entryway wall (i.e., drywall versus brick). Connect each wire from your entryway to its corresponding terminal on the chime box, ensuring each wire has been appropriately secured before connecting it to your Wi-Fi network via Bluetooth or Wi-Fi Protected Setup (WPS).

Although other companies offer multiple installation options, Nest Hello is not manufactured with a battery option and needs to be hardwired. You will be required to install a wired doorbell and chimes or prepare to wire the entire house to make the doorbell compatible with the Nest Hello. The installation process might be easy, but it needs a particular voltage level to function correctly. Wifunctionge, as predetermined by Nest Hello, can easily connect to the home. Before purchase, the owners should make sure their home is ready for smooth operation.

To install Nest Hello, the essential requirement is to adjust and set the voltage to ensure the doorbell works correctly. If you already have a properly battery-based doorbell, install wires and chimes before setting up Nest. However, if there is no doorbell or an intercom system, you will be expected to contact Nest Pro and ask for help. This will be the first step in figuring out the rest of Nest Hello’s installation process. If you have a doorbell, the process gets trouble-free as you need to set up the voltage.
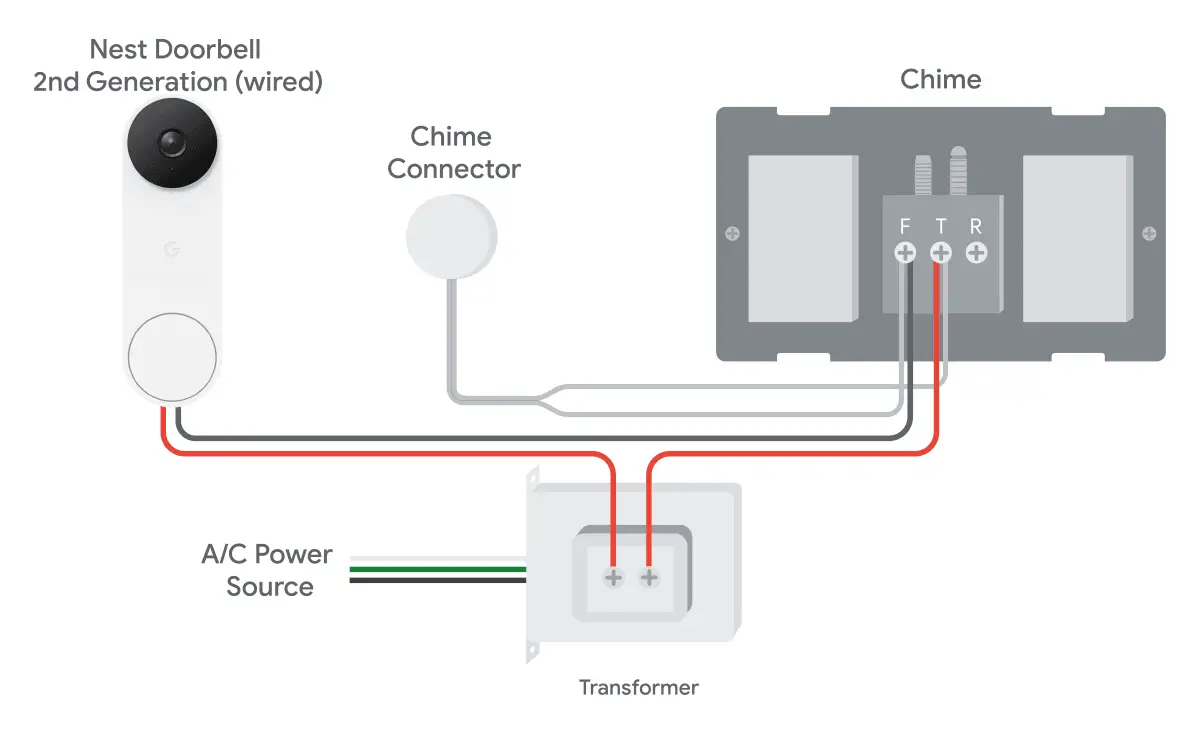
According to their official website, the wires will be compatible if there are two or more wires. Even though it is battery-powered, it does not mean it would not be functional at all. As long as there are wires, there is a good chance of compatibility. An electrician will be required to set up the wiring system to associate with Nest Hello. The wiring should have T, F, and R marked to understand the installation process. Without any labels on the wiring, help would be needed from Nest Hello or professionals. Once you have determined whether you have wires, the next step would be to deal with the voltage professionally.
There are three main ways to check the voltage.
1. Using a millimeter
2. Asking a professional
3. Finding the transftransformer’sge.
If you want hassle-free work, contact Nest Pro or a local electrician, who will quickly check the voltage. As professionals, they will figure out the voltage and install Nest Hello if you want to avoid too much work. This will add a bit to the cost but allow you to stay under budget, saving time and extra effort.
Conclusion
Finally, after ensuring everything is connected correctly, you can install the power adapter and faceplate for the Nest Doorbell. Begin by attaching one end of an included extension cord to a weatherproof outdoor outlet located within five feet of where you will be mounting your Nest Doorbell, then plug in and attach it into place, securing it with screws if necessary before screwing in its faceplate with provided mounting screws until firmly attached in area.
With all three pieces securely installed now, all that is left is to set up and configure it using Nest’s iOS or Android for additional features like motion detection notifications, etcetera. Once connected successfully, you’re ready!

From 2022 onwards, Mark has also been contributing author of home repair articles at nimblefreelancer.com.
Read more on Mark Brown's biography page.
Contact Mark: mark@nimblefreelancer.com