Wrapping your apartment’s roof sheathing and belts with high gloss aluminum, you’ll never have to scrape, prepare, or varnish those rooflines again. New aluminum exterior siding (the bottom of the overflow) and belts (some upward garnish at the rooftop line) will still not peel or degrade, so they will last significantly without cleaning. Steel is a poor substitute for wood exterior siding and windows. Covering them with aluminum trim will need less work than repairing, scratching, and repainting the existing wood.
Tools that you will need for soffit installation:


- Tape measure
- Safety glasses
- Sawhorses
- 12-in trim nail punch
- Pry bar
- Utility knife
- Jigsaw
- Framing square
- Fascia folding tool
- 4-in-1 screwdriver
- Circular saw
- Combination square
- Plywood-cutting circular saw blade
- Hammer
- Chalk line
- Tin ships materials for soffit installation:
- Soffit panels
- 1-1/2-in. trim nails
- Drip edge
- J-channel
- Fascia
The above article will teach you everything you need to understand to do it yourself and how to build an inexpensive soffit-cutting machine that operates just beside the expensive machines used by the pros. You’ll even save a lot of cash if you do it yourself. Unless you’re not afraid of heights and have basic hand equipment skills, you’re perfect for sheathing your living area belts and gutters. As you’ve seen, the delicate, light aluminum accent is simple to shape and cut using low-cost tools. Several unusual pre-twisted elements make the installation a breeze. Operating alone, you can enclose the exterior siding and sash on a 1,200-square-foot house in about five days. Get quite an employee to slice and deliver your stuff, and you’ll be well on your way. The ingredients are expensive. Nevertheless, you’ll save considerably more if you do it yourself rather than hiring a professional.
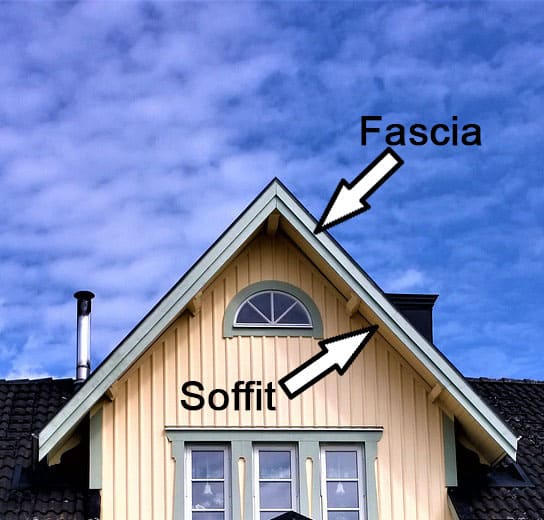
Figure A:
Secondly, repair the roofs. If you keep problems hidden, they will only become worse! If roofing exterior siding or rooftop defining is water damaged, you most likely have real rooftop troubles that you should address before undertaking this work. Even though rainwater will not destroy the replacement metal, hiding proof of perforations may hasten hidden hardwood decay. Ice dams, shingles borders that are damaged or do not expand far enough, and, unexpectedly, listing panels that create a box merely beneath the window are all common problems. You could even require a second roof. If you are unsure, have a master choice before you begin. A significant part of the battle is simply figuring out which one is named!
How to install a soffit?
To install the soffit and fascia, follow the steps below and watch the video. Soffit installation steps are:
-
- Prep the old roof edges and prep the soffit
- Install the soffit panels and install aluminum J-channel
- Measure and then cut soffit panels
- Nail up the panels and trim nail punch to drive 1-1/2 inches of soffit nails.
- Join panel
- Nail additional panels
- Cut holes on panels for lights
- Install the facia panels
- Drip edge
- Cut and bend all corners
- Install the fascia
- Trim the peak
- Install the drip edge
How to install aluminum soffit and fascia video is presented below:
Soffit panels are available in 12-foot lengths, 12-—or 16-inch widths, and vented or propane heater configurations. The ventilated soffit features many openings that allow air to flow through while keeping caterpillars out. Unfortunately, there are no openings in a robust (uncooled) ceiling. Most installers utilize just vented material, even in regions that needn’t bother venting, such as peak closes (the tops at the finishes of rooftops).
How to replace the soffit?
To replace the soffit, you need to do the following steps:
- Remove Shingle Mold.
- Remove Rotted Fascia but avoid damage to roof shingles.
- Remove Old Soffit
- Remove the Rotted Rafter using a reciprocating saw
- Attach Cleat to support the new overhang.
- Attach New Rafter and screw the rafter to the chimney
- Seal Replacement Soffit (protect from water penetration)
- Attach Replacement Soffit
- Replace Crown Molding along the wall of the house
- Attach Replacement Fascia
Soffit replacement advice
Make your life simple—stay with 16-in. wide ventilated boards to work on requesting and cover huge regions quicker. To work out the amount, increase the width by length (in feet) of every soffit surface, add them all up to get complete area and separation by 16 (the area of one 16-in. board), and add 5% extra for waste and covers.
The aluminum belt goes straight over the wood sash and has a lip at the base that laps over the external edge of the introduced aluminum soffit. It comes in two basic standard widths: 6 and 8 in. First, measure your wood belt’s width to determine which width to purchase. Next, measure the length of the current belt’s indirect feet and gap by 12 to build up the required 12-ft belt, as well as the J-channel segmentsare. Then, at that point, add 5%. J-channel: J-channel is a (shock!) J-formed length of aluminum that the soffit squeezes into against the house. Use it to moor any edges of the soffit that are not covered by an aluminum sash.
Metal trickle edges might be on your property right now. It protrudes behind the roofing and directs excess water from the ring’s upper shell. If the present dribbling edge fits and you’re happy with the coloring, you may keep it. Next, divide with an all-direct movie of the features of the top edges by 12 to control the number of bits of the trickling border. Finally, at around that moment, multiply by 5%. I said it works. Try not to walk around on standing stools to check your roof sheathing and sashes (you’ll have plenty of practice later). To generate an approximate average, estimate the divisions and “basic estimation” overhang durations.
Hold a manometer at the inexact rooftop point midway of the partition (straight beneath the top) on summit closures to determine measures for peaked trims. Eliminate any previous shingle ornamentation and baseline plates, and replace worn-out sashes. Increased soffit venting was required, and old soffit grilles were removed to increase wind current. Begin by disconnecting the drains. Fixing drains may be a real pain.
Nonetheless, they may be recycled if they survive the removal flawlessly and the color complements the new border. Some aluminum designs are conveniently crumpled, so have someone help you keep them down. If you wish to reuse them, leave the weak or absent in place and separate them at the bends. Start preparing yourself; if things go wrong, you may replace the drains with the new trim.

Soffit valves are currently installed in the majority of residences. They let outdoor air through into the upper chamber, which helps to prevent ice jams in the winter and keeps lofts pleasant in the early summer. Before installing a perforated soffit board, removing any present vent plugs is best to provide a more open airflow. You should have almost one square foot of vents for every 300 square feet of roof area, so add extra if you lack circulation. The gaps shouldn’t be too noticeable because they’ll be filled with fresh content. Insert new apertures in the intervals between gable outlines for easy trimming. Space apertures are relatively evenly distributed throughout each soffit portion for even air.
The existing wood sash panels should be strong enough to support the new belt studs. First, examine the wood texture by inserting a knifepoint into it. Replace splintered or ruined wood with flat pine strips of the same width and density as the older. Corrugated moldings are thin accent sheets fastened to the frame’s highest altitude in the absence of drains—they, like dribbling edge, deflect excess water away from the screen to minimize climatic damage. To prepare for the aluminum, pry these off with a leveling bar and extract any superfluous nails. If the home has frieze magically reappears (trimmed loads up directly beneath the exterior siding), remove them unless their removal creates an unfilled space seen between the exterior and the new roofline. If that is the situation, remove it and smash the J-channel into all this. It is optional to remove the border wood.
Do it if you intend to replace your flooring at some time. Either way, you can remove the old paneling without damaging the new roof sheathing. Aside from the jigsaw, neither of these tools is very costly. Therefore, it is usually cheaper to buy them than rent them. Household centers provide the same high-quality tools as professionals—a pair of straight-cutting tin cuts. If you need to cut curvatures in circles (for example, circular fluorescent bulbs and main electrical boxes), use a pair of Democratic or republican cut scissors—trim nail press to keep everything together and inserting nails into cornice channels and tight spots. Mix rectangular—a 12-inch collapsible tool for forming slight bends in a sash to make smooth sash twists at corners.
Razor is used to create vents and remove protruding edges. A woodworker square secured the main cornice boards to the structure. A sledgehammer, utility blades, a meter stick, and a chalk line are all required. Cutting multiple soffit panels with a few clips is time-consuming, resulting in the portions being smashed altogether. A circular saw makes clean, precise cuts a breeze when coupled with a workbench. In about 60 minutes, you may construct a pressed woodworking table (Figure. B). The server’s 45-degree end cuts miters on hip top gable vents (see “Well how Handle Soffit Components on Hip Roof tiles” for further information). Use a crushed wood crosscutting jagged edge installed in reverse—the saw teeth should slide down circularly. Generate a saw edge groove bypassing halfway through the top position of the pressing wood sewing table before rotating around the milling cutter. This allows the razor blade to cut entirely and cleanly through to the metal. Attach a stop rectangular to the table’s fence for quite a long duration of a decent length.
Wood should be cut 1/4 inch wider than the intended width. Employ hearing and vision protection. Attach the J-channel directly into the soffit against the existing soffit. Arrange the anterior and back sides of the J-channel to the same size as the side sheets and slice the foot to spread out the size of the next piece on the sides above the side sheets. To provide corners with a fake miter look, cut a 45-degree tip on opposing pieces. To verify the overhanging height is consistent, measure the distance from inside the J-channel over the front of the hardwood soffit in very few places. Insert the first board into the J-channel, even against the separator, with the wrinkled side facing the establishing channel. Exterior sheathing boards should be cut 1/4 in. smaller than the estimate. If there are differences between the interior and outside, adjust the cut widths proportionately. With something like a craftsman’s round, center the whole thing to the home and fasten the panel’s exterior to the bottom of the hardwood sash. Using trim nail punches, drive 1-1/2 in. soffit screws into the exterior V-grooves, slotted spine, and center depression of planks with focus facing. Insert the mouths of subsequent boards through into grooves of the previous boards, and then insert the sides furthest to the building through into J-channel, marrying the mouths and segments simultaneously. Cut circular apertures for soffit lamps by putting a screw through the center of inspected circles to create a section location for bending chopping cuts.
Fixtures have chambers with adjustable wing nuts, allowing the jars to fall even with the different screens. Regular electrical enclosures can be expanded using extension rings to be cut parallel with the metal. When you use standard organizational grouping, the process goes more smoothly. Screw down the J-channel first, then perhaps the soffit planks, the belting, and finally the trickling edge. Moving the standing stools (or scaffolding) and chopping tables throughout the house is challenging, so concentrate on finishing all shades in succession until you reach the borders. You’ll have to bounce back and forth between peak and eave shuts when you’re through incorporating the edges. Before transferring anything, try to finish as much as possible on one soffit. This is not a time to be a tight-arse framework for high areas. If you have a one-story house, you can still do the job effectively with wooden poles. However, if you have loftier goals, for example, engaging with secondary layers of soffits, you should go to the leasing yard and demand a segmented design and steel framework.
Measure the height of your roof sheathing, and the rent specialists will help you assemble the proper components. You’ll get to have a move on after you’ve mastered the nuts as well as bolts of both the soffit setups, but for the average projected house, they should count on leasing the frameworks for about 72 hours. To economize on rental rates, correct the low roof sheathing with folding chairs before renting it. Notify the army organization for assistance with electric cables that are too near or cross through soffits like belts. Comprehensive bit-by-bit installation instructions for soffit boards can be found in the images.
The critical issue is the unnoticed subtleties. When you examine fresh sides, clean miters, and level edges, you can see the difference between wrong and high-quality handiwork. And here is the critical stuff: J-channel advice: Having 1-1/4 in. shingles nails smashed through into soffit outline, nailing J-divert set up tight against the present soffit. Concentrate your efforts on the extremities. You’ll be seeing things for a long time. Suggestions for soffit boards: Introduction The primary soffit boards oppose the house with both the notched sides towards the bearing you’re inserting, using a woodworker’s triangle. You’ll frequently have to measure, slot the last boards around curves, and cut. These same ones in the center of the completion are essentially introducing oneself. The J-channel anchors the soffit border on the right side of the aisle. Nail the other soffit corner to the hardwood sash to secure a good. Place one nail in each exterior V-groove and the see,gment rib’s lip. Run a nailer out across the soffit’s centerpiece for soffits that seem to be longer than two feet for further support. Fasten the slat to the lowest portion of the hardwood soffit with 2-in. studs, highlighting people.
Nail tips: Use 1-1/2 in. aluminum or coated steel nails to secure all-aluminum trim, shade painted to match the accents. If a selection must be made, choose ideally. They are more durable and do not twist as quickly as metal nails. A trim nail punched includes a depressed slid pusher that not only retains screws as you pound (saving you from broken knuckles) but also allows you to put nails in deep fissures where its toboggan cannot reach. Purchase yourself one! Hip roofs are pyramid-shaped, which means that all of the roofing slopes slope up from the eaves. Because all the roofing edges are overhanging (no peak closures), horizontal soffits continue around obstacles. To cope with the graft, install a soffit across corners using successive J-channel or a miter divider. Using the 45-degree angle highlights on your beadboard table, execute 45-degree notches on panels.
Slip the dribbling edge underneath the asphalt shingles and head through the aluminum sash. Start scoring the highest points of the sides to connect the spikes and bend the base for a sleek look. Comprehensive bit-by-bit setup directions for the belt and dribbling edge may be seen in the photos above. When hammering the aluminum sash, take extra care: stamping cuts and bent or liquid crystal display ( LCD nails emerge later in life. Begin inserting the aluminum sash at the center of each length by pressing it up snugly against the lowest section of the soffit planks. Fasten it, then find your way in two directions, inserting nails every 16 inches, about one inch from the top and bottom—Hammer through into the lap and traverse connections 1 to 2 in. As the exhaust vent closes on a slope, make your way uphill with both the smallest sashes last. Crossing the finish line joints will evaporate water this way. Other than the level “packaged” soffits shown in this section, older (and some newer) homes may feature a soffit type that displays either exposed roof truss tails or enclosed soffits, which follow the inclination of the roofing.
Aluminum soffits can also be built to meet the tilt of the roof. Moreover, you may use 2x4s to level sloping soffits and provide a nailing foundation for the aluminum trim. Then, there will be no cornice to attach the J-channel; it must be anchored to the separator. Stamp every two feet of J-channel with a 1-inch overall score and twist it up. The above tabs might then be fastened to the partition. Another alternative is to connect the F-channel (which serves a similar purpose as the J-channel). This same F-shape, on the other hand, enables you to attach the ribcage to the division) parallel with the border, wibbly turvy to get the roof. Fiberglass soffits were available in various colors, but you’ll likely see brownish and gray at home shops and hardwood lumber. If you want a more noticeable selection and often higher quality supplies, browse the White Pages for “Siding Substances” to find a specialist’s shop.

From 2022 onwards, Mark has also been contributing author of home repair articles at nimblefreelancer.com.
Read more on Mark Brown's biography page.
Contact Mark: mark@nimblefreelancer.com