Installing shiplap over drywall is a great way to add texture and character to any room in your home. Shiplap is a type of wooden paneling characterized by overlapping sections, creating a “lap” look when installed on walls and ceilings. Whether you have existing drywall or are starting from scratch with new drywall, installing shiplap can be a relatively easy DIY project.
Remember, shiplap is not out of style!
What is shiplap?
Shiplap is a traditional wooden (or PVC) board consisting of horizontal or vertical sheets with unique channels in the panels. It is commonly used as exterior siding in the construction of residences, barns, sheds, and outbuildings.


Now, the cheaper way is to use drywall.
Drywall definition is:
What is drywall?
Drywall represents a flat panel of gypsum plaster sandwiched between two sheets of thick paper. Drywall is also known as sheetrock, which is composed of gypsum material. These boards are placed on the sides and forced into the walls through self-drilling drywall screws. This thick sheet material is commonly used to construct interior walls and ceilings. Drywall consists of large rigid sheets that are mounted without mortar or plaster.

Different renovation techniques and decor expertise produce unique and creative interior finishes. Shiplap is one procedure that can instantly transform dysfunctional and unappealing houses or sheds into the epitome of modern and elegant house structures.
Do-it-yourself enthusiasts can also lead by installing good quality plywood planks, a few basic toolsets, and watching some tutorials. The house view can instantly be transformed, adding a rustic yet sophisticated look to the walls and ceilings.
Likewise, the eye can change the flat and unappealing walls of the bedroom, kitchen, and family rooms. Shiplap is a common trend and a good form of rustic and country-style home. The choice of wood can be covered in place of the drywall and ceilings; most commonly, shiplap is used for this purpose.
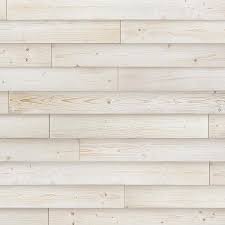
Shiplap is the wooden planks or boards used as exterior wall cladding for protective purposes in constructing residences, barns, sheds, or houses. It is a rigid casing with panels overlapping the edges to form a flush joint. Convention shiplap consists of an indentation cut into the planks’ top and bottom, allowing the pieces to fit perfectly and creating a tight seal.
This design also gives shiplap a typical appearance of horizontal reveals between each piece of wood. Shiplap is mainly associated with cottages and cabins because it was historically used to keep the drafts and water away from the houses for its overlapping characteristics. Shiplap has become a popular choice for interior finishing because it gives a refined texture to the rooms. It adds character even if applied to the drywall, including the bathrooms.
Please read an article about shiplap and drywall costs.
Can you install a Shiplap over drywall?
Yes, you can install a shiplap over drywall. However, you need to know that shiplap will be heavier than drywall and be cautious. You should use the standard 15—to 16-gauge nails during shiplap installation over drywall.
The installation is not laborious and consists of a simple assembly process, such as putting puzzle pieces together. However, shiplap is widely recognized and acknowledged as having commendable resistant qualities because this technique is used to line boats. In addition, it creates a watertight wall against the elements of nature and is preferable for outdoor sheds.

What size nails for shiplap over drywall?
You should use the standard 15 to 16-gauge nails during shiplap installation over drywall. The key is not the drywall but attaching the shiplap to the studs behind the drywall.
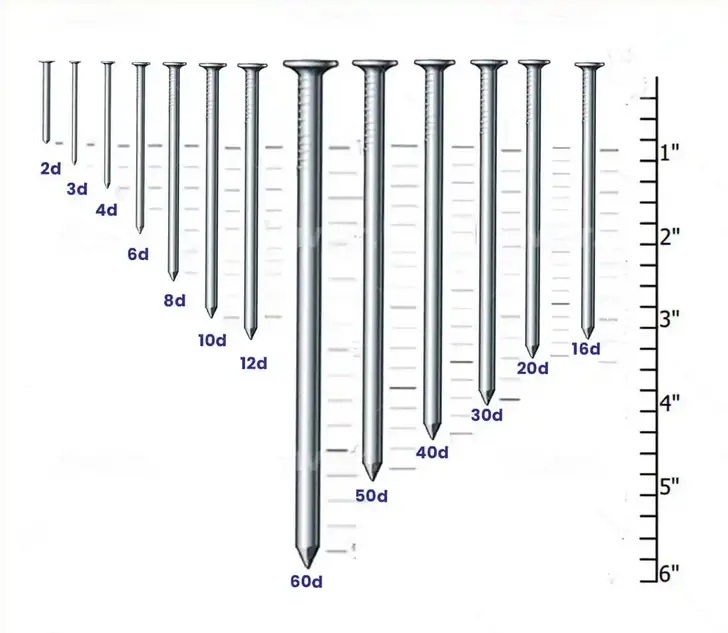
When installing shiplap over drywall, using the correct size nails is essential for a secure, lasting installation. The most commonly recommended nail size is 15 to 16 gauge. This will provide the strength and hold to ensure your shiplap remains firmly in place.
Using the correct size nails is essential because they must be able to penetrate through the drywall and into the studs beneath. If a too-small nail is used, it can easily bend or pull out of the drywall without adequately securing your shiplap. On the other hand, using a nail that’s too large can cause cracking and damage to both your shiplap and drywall.
The critical factor when deciding what size nails to use isn’t necessarily the drywall itself but how deeply you need them to penetrate through the material to reach and secure your studs. A 15 or 16-gauge nail should guarantee a solid installation on any wall surface or structure.
In addition to choosing the right-sized nails, there are some other factors you should consider when selecting fasteners for your shiplap installation project:
- Type of Nail: You can choose between galvanized steel nails (recommended) or aluminum finish nails (less expensive but not as strong).
- Head Style: Choose a round or flat head, depending on whether you want a neat finish with no visible heads after installation or prefer easy removal later on.
Regardless of what type of fastener you choose, ensure it’s long enough to adequately penetrate through all layers of material—from drywall down to your studs—for maximum holding power. Taking these precautions will ensure better results when it comes time to put up your new shiplap!
How to install shiplap over drywall?
To install shiplap over drywall, follow these basic steps:
- Measure the wall to determine how much shiplap you will need.
- Purchase shiplap boards in the desired size and finish.
- Remove any baseboards or trim from the wall.
- Use a stud finder to locate the wall studs behind the drywall.
- Mark the location of the studs on the drywall surface.
- Cut the shiplap boards to size, if necessary.
- Apply a construction adhesive to the back of each panel.
- Place the board onto the wall, starting at the bottom and working your way up.
- Use a nail gun to secure the board to the studs, placing nails at the top and bottom of each board and along the stud lines.
- Using a nail gun will save time and allow you to install a shiplap easily. Install a shiplap-like puzzle from down to the upper area of the wall.
- You should use the standard 15 to 16-gauge nails during shiplap installation over drywall.
- Use a coin like a quarter or nickel between the planks to keep the proper spacing.
- Continue installing boards in this manner, leaving a small gap between each panel to allow for expansion.
- Once you have installed all the boards, replace any baseboards or trim.
The first step in the installation process is to prepare the drywall for the shiplap. This includes filling any cracks, holes, or other damage with a joint compound and sanding it until smooth. Carefully measure the wall so you know how much shiplap material you need for each section. Ensure that all edges are even and that there are no gaps between them, as this could allow moisture to seep into the wall or cause warping over time.
Next, attach furring strips to your drywall before installing the shiplap. These strips should be at least 1 ½ inches wide and installed horizontally along the length of each wall section to evenly distribute weight and provide extra stability for the paneling. Start at one corner of the room and use a level to ensure each strip is straight before securing them with nails or screws.
Please see the video on how to install shiplap :
Once your furring strips are installed, you can begin attaching the shiplap! If your material has tongue-and-groove edges, start at one end of each wall section and press each board firmly until they lock into place. If they don’t fit tightly together, use construction adhesive behind them to ensure they stay put once installed. For materials without tongue-and-groove edges, nail/screw them directly onto the furring strips using galvanized nails/screws every 4 inches (or as the manufacturer recommends).
Finally, caulk around all seams where two pieces of shiplap meet up against each other—this helps prevent moisture from getting trapped between boards while also giving it a finished look! Once everything is set up and dried according to manufacturer instructions, you can paint or stain your newly installed shiplap however you like!
Installing shiplap over drywall may seem intimidating, but following these steps should help simplify things for anyone interested in embarking on this project themselves! With careful preparation and attention to detail during installation, you can easily create an eye-catching feature within any space that adds unique character and charm!
Overall, installing shiplap over drywall is a relatively simple process that can be completed with essential tools and materials. However, it’s crucial to properly align the boards and secure them to the wall studs to ensure a stable and durable installation.
Most modern residential homes have directly installed drywall, so the shiplap installation becomes tricky. Removing the drywall creates a needless mess and waste of time, which also comes with an added expense. Considering this predicament, many homeowners think ship lapping over the existing drywall, which acts as a support surface.
Therefore, installing shiplap over the prevailing drywall is possible, but the principal layer needs to be prepared for an additional layer. Before the shiplap is applied, ensure that the wall is damaged or needs little maintenance. Mark the studs on the walls and check them before placing the single board.
To do that, the homeowners need to invest in a stud finder that helps locate studs underneath the existing drywall. This will avoid a complete scraping of the wall, and depending on the model, the beeper will light up, indicating the stud. Installing shiplap over drywall is similar to faux planks as they directly attach using a nail gun.
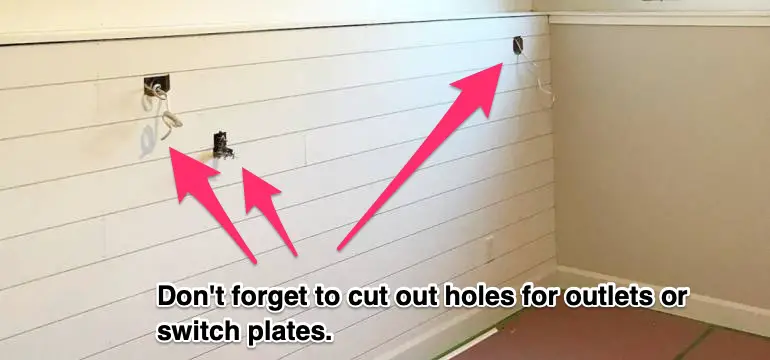
However, the shiplap is heavier, so marking and highlighting the studs must be done before initiating the process. You cannot ignore the process of locating studs; otherwise, you would not know where to anchor or install the shiplap. If you nail them directly on the drywall, it could create large-scale damage. The drywall also needs to be painted before the installation of a shiplap. Taping and mudding protect the drywall from insects, drafts, and pests that might enter the wall.
After identifying the studs, the foremost task before the instigating process is to join the planks with a particular clue. In this condition, most construction glues will work perfectly to link the planks. However, is it essential to note the drying time; otherwise, the planks will come off?
An essential factor that needs to be considered before installing the shiplap is to ensure the direction of the shiplap hanging. It can be placed horizontally or vertically, but the former is popular among homeowners. Horizontally hanging the shiplap lets you quickly locate the studs behind the drywall. After highlighting the points of the studs, use the adhesive to stick the shiplap to the wall. The shiplap material should also be flattened, which can be accomplished using a separator. If the shiplap is darker than the drywall’s light color, it must be painted to complement the room’s color scheme. The nails exposed after installation can be concealed or disclosed for a rustic charm. Nevertheless, shiplap can also be installed without making the drywall a base. This can only happen when a house is constructed from scratch to pin the shiplap directly.
Shiplap has multiple advantages, as it is a quick fix and can be installed immediately. Minimal effort is required and can be done without much prior experience, so hiring professional carpenters is not always necessary. Ship lapping also creates a minimal mess instead of drywall, where the latter needs taping, mudding, and sanding, which leaves a fine layer of dust all around. Shiplap is wholly nailed to the wall, as there is no need to tape the joints.
Although drywall sheets are inexpensive, the cost increases when taping, mudding, sanding, and painting. Shiplap can be performed at half price and falls under the proposed budget even after painting. Lastly, the durability of shiplap cannot be ignored.
The idea of placing shiplap over the existing drywall is a question of ability when remodeling and reconstructing a house. It gives a spark and texture to the rooms, but it does not necessarily have to damage and tear out the existing drywall to make the room attractive.
Shiplap is not demanding, as it is similar to placing hardwood flooring from one side of the wall to the other. You can cut the uniform boards from the plywood and then paint them according to the room’s color scheme. Shiplap is beautiful, durable, and practical. Many people tend to leave their nails exposed to hang pictures or frames, adding a decorative touch to the house. Easy to install and relatively cheap, this can be a perfect option for modifying the home.

From 2022 onwards, Mark has also been contributing author of home repair articles at nimblefreelancer.com.
Read more on Mark Brown's biography page.
Contact Mark: mark@nimblefreelancer.com