Using ClickFunnels with ClickBank is an effective way to increase your online business profits. ClickFunnels is a powerful tool that helps you easily create beautiful sales funnels, while ClickBank allows you to monetize those funnels by promoting digital products. Combining the two will enable you to maximize your potential and make more money from your online business.
Before starting, it’s essential to understand how each element works separately so that when you combine them, everything runs smoothly. Let’s begin with ClickFunnels first.
I used most of these photos and steps as screenshots from the Clickbank website.


How to integrate ClickFunnels with ClicksBank?
- Create an account on ClickFunnels and ClickBank if you haven’t already done so.
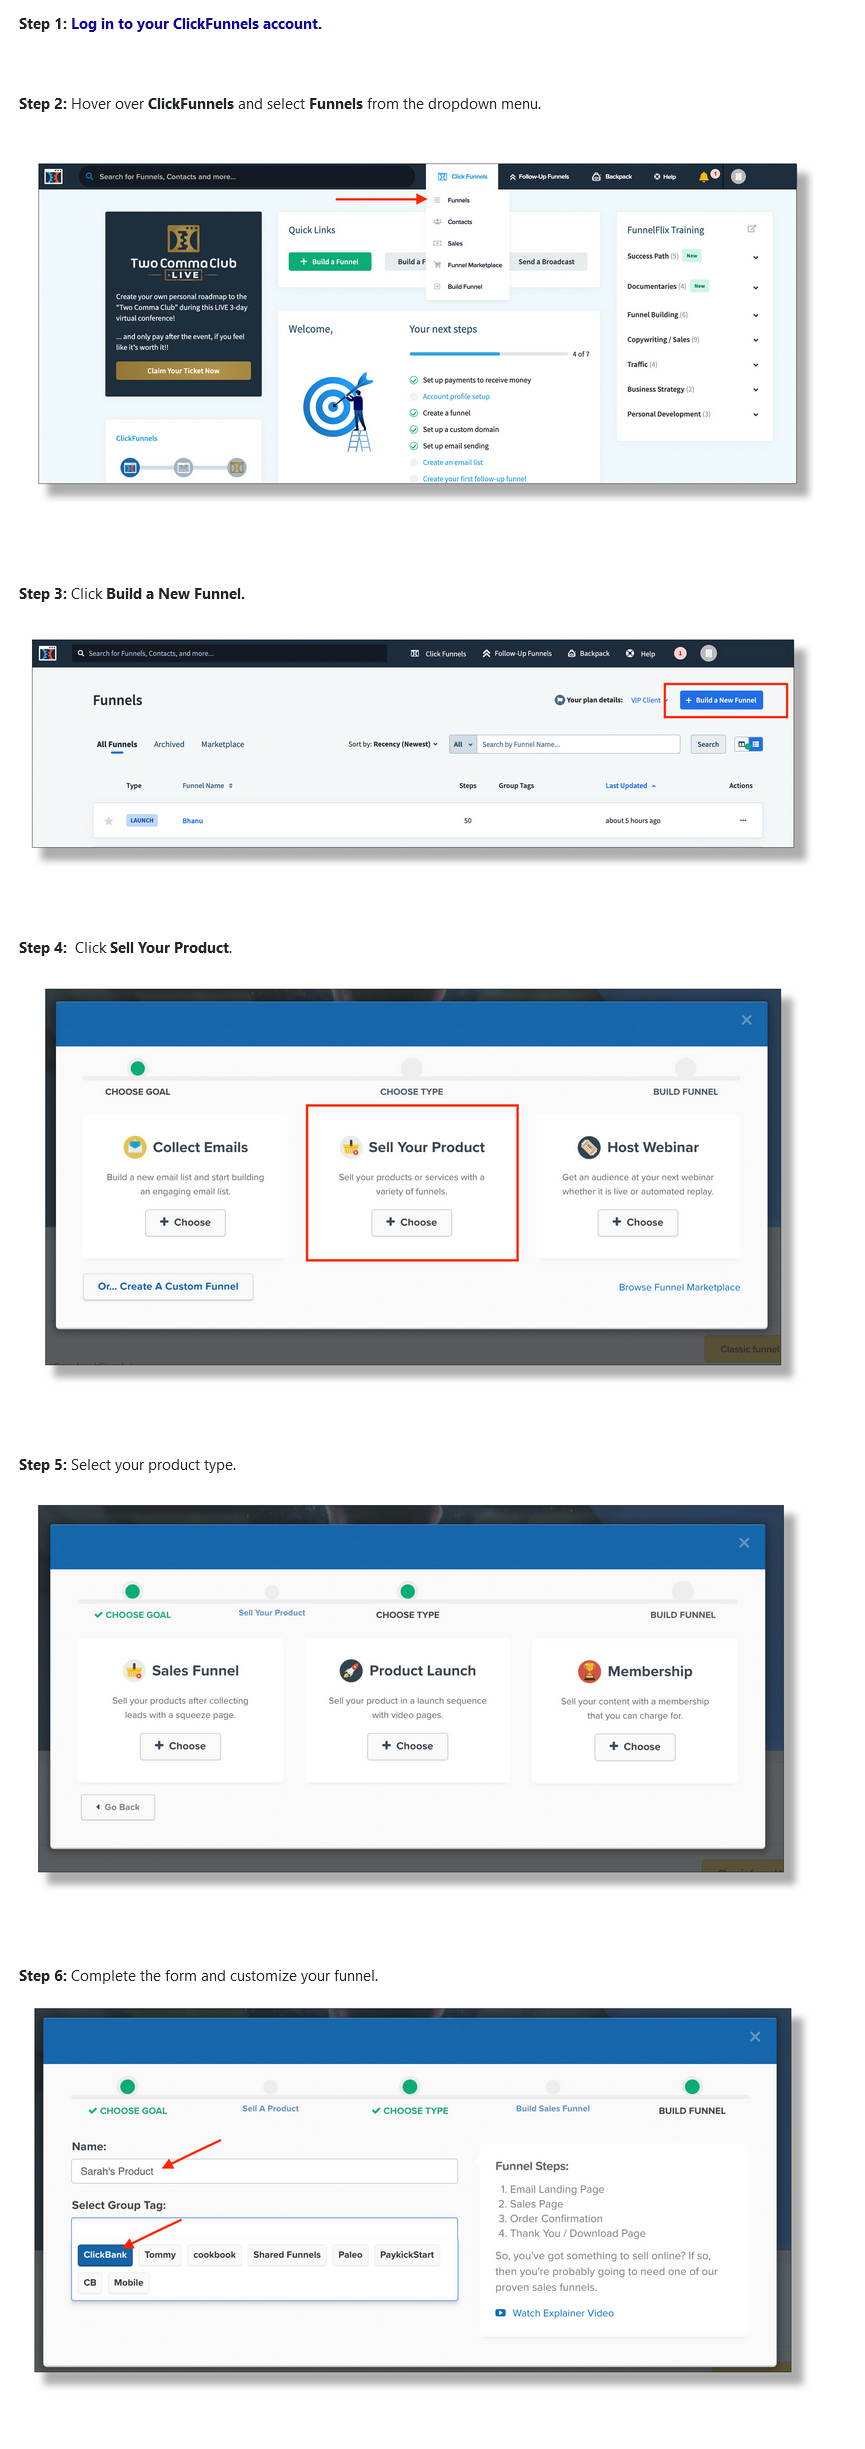
- Log into your ClickFunnels account.
- Click on “Add New” to create a new funnel.
- Choose the type of funnel you want to create.
- Create the necessary pages for your funnel, such as a landing page, sales page, order page, and thank you page.
- Set up your payment integration by connecting ClickBank to your ClickFunnels account.
- Go to “Settings” in the funnel builder.
- Select “Payment Gateways.”
- Choose “ClickBank.”
- Log into your ClickBank account.
- Create your ClickBank product and set its price.
- Set up a “Thank You” page on ClickBank, where customers will be directed after making a purchase.
- Go back to the funnel builder in ClickFunnels.
- Add a new step to your funnel and choose “Order Form.”
- Customize the order form to include fields for customer information, such as name, email, and billing address.
- Add the ClickBank product to your ClickFunnels order form.
- Go to the “Order Form” page in ClickFunnels.
- Select the “Product” tab.
- Choose your ClickBank product from the dropdown menu.
- Test your funnel by making a test purchase to ensure everything works properly.
- Once your funnel is set up and tested, you can start driving using various methods such as Facebook ads, Google ads, and social media.
- Monitor your funnel’s performance regularly to see how it’s converting.
- Make any necessary changes to improve its effectiveness.
- Consider adding upsells and downsells to your funnel to increase your revenue.
- Use ClickFunnels analytics to track your funnel’s performance.
- Continue to optimize your funnel over time to maximize your sales and revenue.
See the photo for instructions on how to integrate Clickfunnels with ClickBank (steps from Clickbank website):

How to Use Clickfunnels with Clickbank?
- First, you need to create an account on ClickFunnels.Click on “Add New” to create a new funnel.
- Choose the type of funnel you want to make, such as a sales or lead generation funnel.
- In the funnel builder, create the necessary pages for your funnel, such as a landing page, sales page, order page, and thank you page.
- Connect ClickBank to your ClickFunnels account to set up your payment integration. To do this, go to “Settings” in the funnel builder, select “Payment Gateways,” and choose “ClickBank.”
- Create your ClickBank product and set its price. You will also need to set up a “Thank You” page on ClickBank, where customers will be directed after making a purchase.
- Add the ClickBank product to your ClickFunnels order form by going to the “Order Form” page and selecting the “Product” tab. You can then choose your ClickBank product from the dropdown menu.
- Test your funnel by making a test purchase to ensure everything works properly.
- Once your funnel is set up and tested, you can start driving traffic using various methods such as Facebook ads, Google ads, and social media.
- Monitor your funnel’s performance regularly to see how it’s converting and make any necessary changes to improve its effectiveness.
How to use Clickfunnels with Clickbank photo instructions:
ClickFunnels is a website builder that lets you easily set up conversion-optimized marketing funnels for any purpose, including selling digital products or services. It focuses on building pages and converting visitors into buyers or leads, depending on the type of funnel you’re creating. It provides an easy-to-use drag-and-drop interface that lets anyone design stunning landing pages in minutes without any HTML coding required. You can customize every page element with simple yet comprehensive customization options. This makes it perfect for creating sales funnels, membership sites, webinars, and other types of automated campaigns.
ClickBank is a marketplace where people can buy and sell physical and digital products like ebooks, audio programs, software products, video courses, and more. It offers powerful tools designed to help merchants promote their products effectively and ensure they get the most out of their sales efforts. It also connects sellers with affiliates willing to promote their products in exchange for commissions from their sales. Its payment gateway system manages the process, guaranteeing secure transactions at every step.
Now that we understand how these two components work individually, let’s discuss how to use them in unison:
1) Register for both accounts: First, you must register for a ClickFunnels account and a ClickBank account if you don’t already have one. With both accounts set up, it’s time to move on to the next step, where we will link them together.
2) Linking Your Accounts: Once you have both accounts set up, it’s time to link them together so that when someone purchases something from your website, they will automatically be redirected to your payment gateway (in this case, ClickBank). To do this, copy the “Order Form URL” from your settings within ClickBank, then paste it into your ‘Action URL’ field within ClickFunnel’s order form settings page for each product/service you are offering on your site (for example, ebook/software/video course, etc.).
3) Setting Up Your Funnel Pages: Now it’s time to start building our funnel pages! Start by designing an attractive landing page using one of ClickFunnel’s many templates—these are designed to be fully optimized for conversions, so utilizing one of theirs saves time and money! From there, create additional pages such as OTO (one-time offer), upsells, and thank you pages—ensure all proceed buttons lead back to your order form page(created in Step 2).
4) Affiliate Tracking System Setup: Of course, if we want others promoting our services/products, then we need some tracking system in place that will track clicks & conversions & attribute them correctly – this system should also generate affiliate links so our affiliates have something tangible they can use in promotional materials/websites, etc… For this, we recommend using iDevAffiliate (or another similar service), as it integrates perfectly with both systems & makes everything very easy!
5) Testing Your Funnel Pages & Affiliate Links: Before launching our new funnel pages & affiliate program live on the internet. However, we must test everything thoroughly – ensure all links are functioning correctly (including affiliate links!), images appear accurately & purchasing process works perfectly too! This is critical. Otherwise, customers may become frustrated & never buy again!

Once everything has been tested thoroughly and checked multiple times, it’s finally ready for release! Switch off ‘draft’ mode within the settings tab inside the ClickFunnels platform dashboard, and your funnel should start working immediately! Alternatively, if using iDevAffiliate, log in there too and switch the ‘Tracker Active’ option back on again before announcing the launch date publicly via newsletters, etc.


Learn more about authors in Nimblefreelancer's team biography page.
- 6 Proven Ways SaaS Founders Actually Get Customers (With Real Examples) - December 17, 2025
- Facebook Ads to Get Followers! - December 27, 2024
- ClickUp vs. Slack - December 20, 2024