Homeowners with even concrete already have a strong base for garden decking, but uneven concrete cannot be efficiently dealt with to create a flat surface. The deck’s construction is not rocket science, but it is not untroubled physically to play with the heavy lumber. We will share a few things, including materials, discussion, procedure, risk, time-saving tips, and some advice on making this less costly task labor-saving.
Before we start, there are two primary questions to answer:
Can you lay decking over slabs?
Yes, you can lay decking over slabs. Use materials such as pine or cedar or lower-maintenance products like composite decking or PVC to cover your aging concrete patio.


Can you put decking straight onto concrete?
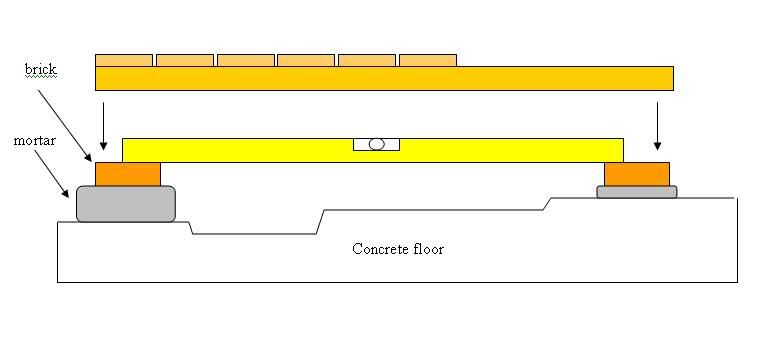
No, you can not put decking boards straight onto concrete or the ground. Decking boards should be fixed to joists of a suitable subframe. The best way to install composite decking on a solid concrete base is to use plastic composite joists.
Now let us start :
How to build a deck on uneven concrete?
To build a deck on uneven concrete to create a sunny sitting area, you need to follow 16 steps:
The most acceptable way to build a deck on uneven concrete for both raised gardens and ground-level uses involves first constructing the deck’s frame, which will point out and facilitate the process.
Let’s get started to see the materials discussed and the procedure to build a deck on uneven concrete.
What would be the requirements?
Building a deck takes two days with someone’s help, and the cost is economical. We have given step-by-step guidance on building a deck on uneven concrete. In step one, you can read the tools, materials, time duration, and cost requirements.
Step 1: Managing time, tools, materials, and cost
At first, you manage time, materials, tools, and expenses.
It usually takes about two days to cover the deck, but we are talking about the big one ( 14 x 28 ft.), which might take at least five days, as the unevenness of the concrete surface is the most significant time factor.
Not only do standard carpentry tools work there, aside from these tools, but a hammer drill that costs $50-100 is also needed to do the job without great difficulty or effort, as almost 50 holes are required. To drive concrete screws much more effectively, buy an impact driver to ensure the packing of more torque. Most people are interested in purchasing cordless models, but you can find cost-effective corded models online. See the list of essential tools:
● A circular saw
● Hammer drill
● Miter saw
● A cordless drill
While discussing the materials, the shape and layout of decking play a vital role in estimating the exact number of each of the following tools required. We will share the quantities of the materials to cover 100 sq. ft.
● 2×4 pressure-treated lumber (90 linear ft.)
● The good flashing tape (90 linear ft.)
● Sixty 3/16 x 3-¼ concrete screws
● A thick PVC trim board of ½ inch
● Concrete screws of 3/26 inch x 31/4 inch
● Decking Board
● A flashing tape
● The plastic shims
● The self-smoothing compound
The last point of the first step is cost. How costly it is depends on your choice. Price ranges from $1.50/sq.ft. for pressure-treated wooden lumber to above $10/sq.ft. for a top manufactured product, so the total cost per sq. Ft. ranges from $3 to $13.
Step 2: Begin with a layout of the deck.
The location of deck sleepers and layout is based on the decking board. Having parallel sleepers for a standard decking design would be best when all the deck boards are unidirectional. Still, for a complex decking arrangement, when you want to support boards that are at the right angle to each other, you’ll need the double sleepers.

Step 3: Overcome the difficulty of water at first
Fill the reservoir with the self-smoothing compound after rain to drain water. Once the first batch turns harder, pour on a thin coat to develop a slope to extract water.
Self-smoothing compound turns harder speedily, so you can proceed with the plan. However, as it is too expensive, you can use a substitute such as Sakrete Top ‘n Bond or Quikrete Sand, which is more than 30% less costly. Another way to stop water from seeping down along the starting point is to seal a gap between the concrete and the house with waterproof sealant.
Step 4: Suggestions for working with the steepers
Although screwing down sleepers is not a complex task, follow the following points while proceeding:
● Penetration of the screws to concrete should be 1 inch by the perfect screws of 3-¼ inch., In low, where we build up the plastic shims, utilize the 3-¾ inch screws.
● During drilling, dust around the drill stretches and overheats the drill bit. To remove the dust particles, remove the drill bit from each hole once or twice.
● A drill works more slowly, bores smaller holes, and it becomes difficult to drive the screws. For this problem, have extra routines. Once you have screwed down all the steepers, double-check the smoothness, and never forget to set a perfect 4-ft edge for measuring the straightness on each sleeper along and across it. If the spots are not in-plane or sound 1/16 inches or more, withdraw the screw to add or remove shims.
Step 5: Predrill for uneven concrete and leveling
The steepers attain the concrete shape to form a smooth plane, as the concrete is uneven with depressed areas and ridges, giving more time to level with shims. As an early show of the situation, lay an aligned board across the concrete in a few spots, indicate the highest hump in the concrete, and fasten your initial steeper there speedily. Then, add sleepers externally and check the fatness; add shims to raise the low spots where needed.
Before driving in concrete screws, drill through sleepers and spacers, and with the hammer, drill into the concrete, stand out the edge, and trim the inessential part to get the exact and smooth length.
Step 6: Screw down to smooth sleepers
With a straightedge, double-check the smoothness and solve the issue of lower and higher spots. If the sites are higher, fill up with the shims. Also, raise the quieter areas slightly with the shims.
Step 7: Use and purpose of spacers
The question arises as to why we need to use spacers.
Cut the spacers from the ½ inch PVC board for the following purposes:
● The fundamental purpose of spacers is to make a path for the water flow. As the sleepers set on concrete are along with the house, each sleeper causes the blockage of runoff. Spacers are used to smooth water flow through steepers.
● Sink the screws of 2-¾ inches in the decking with sleepers and spacers, as the spacers let the longer Screws be completely submerged. Cortex screws made from the same material as decking are highly recommended.
● Spacers keep the sleepers dry and prevent the pressure-treated wood from rotting.
Step 8: Set up the decking board
First, to avoid soaking the sleepers, hide them under the blanket of flashing tape, which keeps them dry during the decking process. As a pointer for the field boards, temporarily start with the darker accent boards. Cut and remove the center divider board when you reach the end of the deck. Finally, trim the sleepers to the final length by removing and mitering the border boards.
To hide the corners of the sleepers, use a board known as a deck “fascia,” made from ½ inches-thick PVC. To do this, cut the fascia into pieces and screw them into the sleepers.
To build a deck and put straight on a hunk of uneven concrete, remove the weed and debris, dig the post holes (almost 1ft.), and set them using post-mix until the top is at or somewhat higher than the required height.
Step 9: Improving the decking on concrete in simple ways
If your decking design is more straightforward, the decking process will be easier, cheaper, and faster.
The crack factor intensifies with time. Cracks tend to grow and move, and some shrink and expand as the soil frosts and warms. Crack sinking might make them uneven, and slow movement makes detection difficult. If you have moving cracks, choose the upgraded concrete that remains undamaged.
Step 10: Pavement under pavers
Adjusting paving stones is a somewhat difficult task in the decking process. It involves concealing the concrete with the pavers. If you are looking for the answers to some questions about Pavement, this paragraph would be more exciting and beneficial for you.
A concrete slab is vital for a solid and stable foundation for pavers. Before laying the pavers, cover the deck with a layer of sand to get the standard paver deck. Now, the question arises: How can the concrete be concealed with pavers?
To do this, settle the field pavers over concrete, remove the excess sand, and cut out the extra garden fabric with a knife. Next, glue down the blocks and wait a few hours until the glue dries. Then, pack the field pavers and sweep sand across the deck to fill the empty spaces in joints.
Step 11: Cover up it under a rug
If your concrete is damaged or you are willing to hide some ugly parts or add a different appealing color, you can cover the concrete with the available rugs in various colors and designs. Although the rugs of the largest size (9 x 12) available in the market don’t even hide the concrete completely, making a massive difference by covering the ugly parts makes them worthwhile.
Step 12: Installing the tiles with a snap
The tiles are interconnected and locked together so that you can install the deck in a shorter period and with less labor. The most commonly used, less expensive tiles for decking over uneven concrete are plastic versions; others with ceramic or wood are specific for a smooth decking surface. If installed over rough concrete with depressions or ridges, they may crack.
Step 13: Ideas for an unbreakable patio
If your patio is crack-free, you should consider any of the following options in the given scheme, such as staining, tiling, and a resurfacing process!
Step 14: Staining
One of the least expensive options to transform a patio is to stain it after a coat of sealer. This method is good for a crack-free deck, but if your patio has ugly or cracked parts, it cannot hide them; instead, they show through the stains. Reseal and restain every three years make it least preferable.
Step 15: Tiling
One of the best ways to transform an uninteresting patio into an attraction is through tiling. The cost of this project depends on your choice of tiles and ranges from $4 to $12 per sq. ft.
Water freezing occurs in cold climates, destroying tiles. If you live in cold weather, pay due attention to the conditions and quality of the tiles.
Step 16: A process to resurface
This process is mainly for transforming a bland patio into an attractive one that looks like a new one on a lower budget, and it involves using a coat for resurfacing. First, you will intermix a cement-based powder with water to spread over the concrete. Then, if you are willing to repair the cracks, you can resurface, but this is a short-lived improvement, and damage reappears again. Following are the highly recommended brands you might find helpful:
● Quikrete Concrete Resurfacer
● Sakrete Flo-Coat

From 2022 onwards, Mark has also been contributing author of home repair articles at nimblefreelancer.com.
Read more on Mark Brown's biography page.
Contact Mark: mark@nimblefreelancer.com