A thermostat is a device that monitors temperature changes to keep an enclosed space at a consistent temperature. It is common for a thermostat to generate electrical signals when the temperature rises above or falls below a preset limit. In most cases, it regulates the flow of fuel, electricity, or heated or cooled gas or liquid into the region it serves. For example, some fire-detection warning systems include thermostats as a vital component.
A thermostat maintains the desired temperature in a room by switching heating or cooling equipment on or off or by controlling the flow of a heat transfer fluid. In several instances, a thermostat may be used as the primary control device for the heating or cooling system. To maintain a specified temperature, thermostats are used in any equipment or system. Appliances such as kitchen appliances like ovens and incubators for medical or scientific research are examples of heating systems. In this post, we will cover everything related to setting a Honeywell Thermostat for heat.
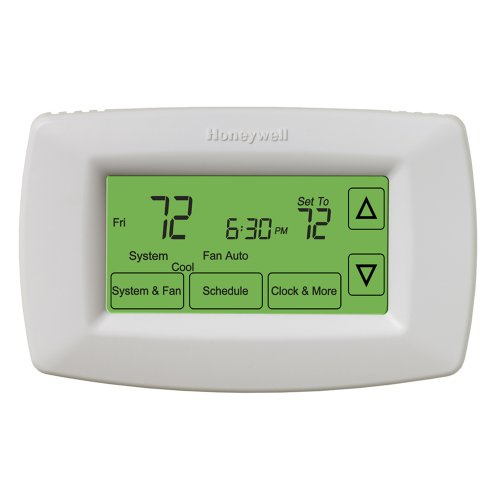


How to Set a Honeywell Thermostat for Heat?
Acknowledge the following steps to set a Honeywell Thermostat for heat:
- To begin, press any of the buttons. For example, to turn the fan on or off the screen’s backlight, press the “Fan” button on the remote control.
- Press the “System” button to change the thermostat’s settings. Next, press the “System” button. Finally, press the button once more to return to the previous configuration. The screen will show the setting you’ve chosen.
- The temperature may be adjusted using the up/down arrow buttons just on the right side of the display. You may set the thermostat to a higher or lower temperature by pressing the up or down buttons.
How do I get a Honeywell Thermostat working again?
You can get the thermostat working again by replacing the batteries, resetting the thermostat to factory settings, checking the air filter, checking the circuit breaker, and checking the wiring for loose connections.
A manual thermostat is that familiar circular thing. With a “System” switch on the left side, you may set the thermostat to heat, cool, or off. An optional “Fan” switch, which may be set to “Auto” or “On,” is also possible. In auto mode, the fan only runs whenever the heating or cooling system is turned on. It constantly runs when the switch for the fan is set to “On.” To raise or reduce the temperature, spin the dial clockwise or counterclockwise.
The CT3200, T8011, RTH230B, and T8112D are just a few programmable thermostats that allow you to program a heating or cooling plan seven days in advance. You may save money on your heating and cooling bills by turning the thermostat down or up at night and when you’re not home. Setting up the weekly plan is the same regardless of where the buttons are located on the thermostat’s face or if “Fan” and “System” are switches rather than controls.
Honeywell thermostats allow you to customize the time and date as well. Once you find the “Set Clock/Day” button, hit it to set the time. The display will show the current time. The Ahead or Back buttons can be pressed and held for as long as necessary to reach the exact time. To ensure the time is right, note whether it is AM or PM and keep holding the button down. Next, select “Set Clock/Day” from the “Set Clock/Day” drop-down menu. The display will show the current weekday. To go to the proper day, press “Ahead” or “Back,” then keep the button down until the desired date. Next, press “Run Program” once to set the date and time. Once you’ve set the time, select “Run Program” to activate the time change for DST or SST.
How to adjust the Honeywell Thermostat?
Remove the thermostat cover and check for problems. Check the level. Adjust the anticipator’s position to adjust the Honeywell Thermostat.
Remove its thermostat cover and ensure the subbase is leveled with the wall. Unless it is, the mercury switch within will not function properly, resulting in inaccurate temperature readings on your device. You can use leveling posts or a flat spot at the top and bottom of your sub-base to ensure everything is level. Next, make necessary adjustments to the subbase, then tighten all the mounting screws.
Adjust the heat anticipator to fine-tune the thermostat’s control of the furnace burner operation. Find the lever arm for adjusting the heat anticipator. If the furnace’s lever is cycling in and out too frequently, move the “longer” setting back to one calibration point. If the room temperature is too hot or cold for an extended period, point closer to the “longer” setting.
Wait at least 2–3 hours before making any further changes. You may have to get a new thermostat if the issue continues. We use a bubble level on the wall to ensure the sub-base is level. When it’s level, tighten the mounting screws. Adjust the heat anticipator lever arm slightly if your furnace cycles on and off too frequently. Adjusts from the room temperature if slightly t is excessively hot or cold.
How to program the thermostat?
To program the thermostat, read the manual. Then, determine the schedule: program the time and date > Select Set >Press the program to set a temperature of Set the learning timer > Set the temperature and press “Run.”
All programmable thermostats work similarly, although their use differs from model to model. If your thermostat includes a manual, keep it close to your hand if you need to use it primarily. Keep a log of when you leave the house (or office) and are gone for at least four hours each time. Make a list of everything you plan to do over the next seven days, including every minute of every day. If you want your programmable thermostat to work, input the current time and date. You’ll change the time and date using the clock if you go to your programmable thermostat, which appears after pressing this button. To go on to the next stage, click the “set” and “day/time” buttons after each item has been set using the up-and-down arrows.
Once you’ve entered the day and time, you’re ready to schedule the thermostat’s temperature. While some models feature a dedicated “program” button, others may require repeatedly pressing the “set” button to scroll through the date and time information. You’ll see a screen similar to the one below on your display if you want to set a “wake” time for weekday mornings. The system will be ready if you set your alarm only a few minutes before you get up.
Having chosen the “wake” time, you must select the “wake” temperature. Your model thermostat’s temperature will begin to flicker if you press the button on it again. You may adjust temperatures by using the up and down arrows on the screen. The thermostat will remind you to arrange your daily departure times if you have specified the “wake” temperature. When no one is home, these temperatures are often raised in the summer and lowered in the winter to save energy. To cycle through and locate your desired settings, press the “set” or “program” button and move the clock up and down for one hour.

The thermostat will then ask when you plan to get home each weekday and what temperature you want. If you want your house to be at the desired temperature when you get home, set the timer for fifteen to thirty minutes before arriving, just as you did with the “wake” option. The thermostat may restore you to the current day, time, and temperature if you press “set” or the “program” button on last weekend’s “sleep” settings. Some models need you to hit a “run” button before the schedule begins.
Conclusion
Newer digital thermostats use thermometers and other semiconductor devices, such as a resistance thermometer, instead of traditional mechanical components to measure temperature. While some digital thermostats use typical 24-volt AC circuits for power, they cannot function on thermopile-driven “millivolt” circuits used in some furnaces.
Each one’s LCD panel shows the current temperature and setting. Most also contain a clock and temperature settings that you may use for both comfort and energy efficiency. More sophisticated models have versions with touchscreens or integrated home and building automation systems. We hope you have acknowledged everything related to thermostats.


Learn more about authors in Nimblefreelancer's team biography page.
- 6 Proven Ways SaaS Founders Actually Get Customers (With Real Examples) - December 17, 2025
- Facebook Ads to Get Followers! - December 27, 2024
- ClickUp vs. Slack - December 20, 2024