If you’re having issues with your Amplifier, it may be time to look at it. The most typical problem is a blown fuse or a broken wire in the wiring. If you’re playing through your tube amp with a guitar, replace any faulty tubes you detect. You can typically fix an amplifier yourself with some quick troubleshooting. In this article, we will acknowledge why the Amplifier isn’t working.
We will discuss car amplifiers and music guitar amplifiers, too.
Why Isn’t My Amp Working?
Your Amp isn’t working due to problems like Overheating, Internal Amp issues, and blown amp fuses.


If an amp becomes too hot, it can go into “protect mode” to prevent a complete failure. Lack of ventilation is a common cause of overheating. Overheating can occur if the Amplifier is placed in a limited location below the seats. One approach to see whether this is the case is to use a 12-volt fan to blow air over the Amp and see What happens. It is possible to remedy the problem by moving the Amp to a more temperate area or modifying its placement.
A fan blowing on the Ampe amp while dumping isn’t a long-term answer. If using a fan prevents it from shutting down and entering protect mode altogether, mounting or moving the Amplifier may resolve the issue. You can improve airflow by increasing the distance between the top, bottom, and sides of the Ampe amp or moving it to a new position.
How to Repair Car Amplifier No Power?
You can repair the car amplifier without power via a remote turn-on wire. The Amp requires electricity from the remote and the power cables to be turned on. Your Amplifier won’t turn on if the electricity for the remote switch-on cable isn’t there. Your finger works as the power source, and the Amplifier’s switch is a device you control with the remote wire.
The remote turn-on cable is usually connected to the radio, so its Amplifier won’t turn on if it isn’t on. For this reason, when there is no power at the Amplifier’s remote terminal or its associated wire, it’s necessary to do a power test at the device’s radio input. If appropriate, installing the Amp or having the remote turn-on linked instead to the power antenna wire on the head is possible. Appoint the amp power. Appoint it only sometimes. The Amp will ship when the head unit’s audio input is tuned to AM or FM radio.
If the remote wire is fine, the following item to check is the power line. This cable should have a battery voltage thicker than the remote wire. Look for any inline fuses, then make sure the wiring isn’t rusted, slack, or shorted out. If the remote & power connections are both OK, the ground wire is the following item to examine. TAmpamp can not AMPN on or perform appropriately if the ground connection is inadequate or nonexistent. Assuming the head unit’s remote cable has voltage when turned on and the Amplifier has adequate ground and power, you are most likely dealing with a broken amplifier.
How do you Turn On the Amp without a Remote Wire?
You can turn the AAmpoff without an Amplifier wire by installing a high-voltage adapter with a trigger. You can also run a wire from the ignition switch to the Amplifier. You can also use a switched accessory wire to power the AAmp’sremote Amplifier. Finally, you can switch the Inline wire to the new remote wire.
Using a switched accessory wire to power the AAmp’sremoteAmp’sinal is the simplest and most cost-effective solution if your car’s stock radio lacks a remote turn-on wire for the AAmp. The new ATM wire will be created using the default settings. The new remote wire is engaged whenever the ignition switch is in the accessory or running position. To turn off the head, use the AmpAmpd to turn off the car’s ignition switch. When you start your vehicle, your Amplifier kicks on, and when you turn it off, your Amplifier kicks off.
A simple switch can be connected with a remote wire if you don’t always have the Amplifier in your car. Most people prefer to leave it on because only the factory head unit can turn it on and off. To turn the Amplifier back off, you must turn it off again, stopping 12 volts from flowing to its remote turn-on wire.
Additional devices monitor the speaker wire voltage and send a +12 volt signal to the remote wire as necessary. Alternatively, you can attach an on/off switch to the remote AmpAmpd and use it to turn the AmpAmp using a remote wire. Finally, you can manually turn the lamp on and off by turning a switch.
How to Test Car Amplifier?
You would need a multimeter to test your Amplifier. To test the car amplifier, hook up the red and black wires, connect the speaker to the Amplifier, and Check its availability.
You’ll need a multimeter to test the Amplifier, but there are numerous methods to use it, depending on what you’re trying for in your automobile amplifier. For example, you can check the wattage of your device using a clamp meter. You can also check your device’s components (such as transistors, capacitors, and resistors).
Acknowledge the following steps to test the car amplifier-

- Connect the red (power) and black (ground) wires. With a good ground and 12 volts, an amplifier can play music. In most circumstances, mounting the device is unnecessary if the only purpose is to check if it works. The chassis of certain amplifiers must be grounded, although most do not. A simple method is to connect the Amplifier’s power amp to the positive battery post and its ground wire to its negative position. A suitable circuit board can be determined if the Amplifier’s power light is on.
- Connect the Amplifier’s output to a speaker. Connect a speaker to the output side of the Amplifier. Listen to see if any sound comes from the Amplifier when the speaker wires and RCA cables from the head unit are connected to the speaker jacks. No sound usually indicates a faulty amplifier that has been overwhelmed in the past and now refuses to perform. The Amplifier is excellent if the sound comes out of the speaker and doesn’t sound distorted or fuzzy.
Make sure all of the fuses are working correctly. The amp chassis typically has at least one fuse in every Amplifier. The most common design is a two-pronged model with a plastic body that is color-labeled. Check your fuse first before concluding that the circuitry within the aAmpis faultAmpif power and ground are correctly connected.
Whether the aAmp’s fuse iAmp’s look to see if the power cable has an inline fuse, a black or transparent plastic case that splits in half or twists apart is commonly used. This fuse is a circular glass with metal on both ends or a little wire running through the center. If the fuse is damaged or rusted, or the wire is split, the AmpAmpll will not turn on and must be replaced.
How do you hook up an amp without RCA cables?
- Connect The peaker Wire to the RCA Adapter.
- Install using the high-level Amp inputs.
- Hook-Up Amp using Line Output Converter
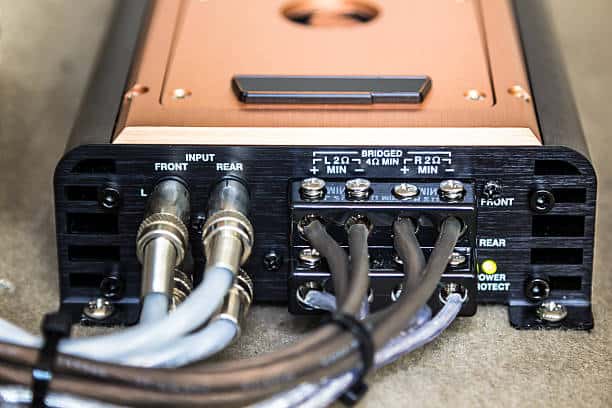
To establish a connection, we’ll first utilize this approach: Add an amplifier to your car’s current audio system. It will raise your music’s volume, clarity, and bass, making it more enjoyable. Many folks don’t know if they should add an amplifier to their car’s factory system, but I’ll show you how. Today, two RCA connectors will be used for this setup. First, connect the speaker’s wires to the RCA plug.
Another name for this is the Amplifier’s speaker-level input. High-level input refers to inputs with a greater voltage than regular RCA inputs. These inputs provide high-quality audio. Run the “Red Power Wire” from the Amplifier through your car’s firewall, then connect it to the battery via the fuse holder.
After installing the fuse holder, connect the head unit and battery. Next, run the “Red Power Wire” and the “Blue Turn-On Wire” below seats or doors to connect the Amplifier—all speakers and subwoofers we wish to run via the Amplifier must be fed audio signals. Using color-coded speaker wires, you must first cut the cables to connect your Amplifier to any speaker or subwoofer.
How to Keep Car Amp Cool?
You keep the Amp Amp cool by Amplifying the size of the car amplifier fuse. Add a cooling fan to the car amplifier, keep extra free space around it, and check the gauges regularly.
You must replace the Amplifier’s fusAmplifier’s identical one that was previously there. It’s possible that the replacement fuse can not have the exact dimensions as the original. You must use the same fuse size as the one you removed. The fuse’s specifications are listed on a label attached to the device. As a result, all requirements must match the fuse already linked to the Amplifier. If the amplifier parameters have been met, purchase a new one.
If you place your Amplifier in an area where air can flow freely, it will be an amplifier. Then, there’s no need for an extra fan. If the Amplifier is high, a fan will be positioned correctly to amplify heat. Two Amplifiers are all you need to attach the cooling fan. As a result, there will be a reduced risk of overheating.
After the Amplifier is mounted, you must clear the surrounding area. Placing the Amplifier in an amplifier will cause it to heat up. Due to its crowded location, the Amplifier can heat even after being fitted with a cooling fan. You must set the Amplifier to an amplifier since things might get out of hand.
The fundamental goal here is to allow the air to flow freely through the Amplifier. Because the Amplifier might be overheating at any time, you must check all the readings. As a result, you have a better chance of anticipating what will happen and responding accordingly. Monitor thAmplifier’s temperature after completing the preceding stages. You must call a professional technician if the Amplifier continues to overheat.
What Is Rem On an Amp?
The Rem on an Amp stands for Remote. Amp is the TV set you can plugin, but nothing will happen unless and until you click the power button. You can replace the wire with a remote trigger or utilize your box’s IGN or ACC fuse.
Computer enthusiasts, engineers, and gamers should be able to answer this question quickly. Rem is an abbreviation for “remote .” The Amplifier is turned on through the remote control when the stereo is turned on. In the same way that you can put a television into a wall outlet, and nothing will happen until you press the power button, AMPs are similar. The power button, then, is this rem? You can connect the wire to the remote trigger or utilize your box’s IGN or ACC fuse. Splice the wire into the fuse and push it in. For that reason, you’ll need to run a new cable.
Why Is There No Sound Coming Out Of My Amp?
No Sound is Coming Out Of your Amp because your loudspeaker is completely blown. Other reasons can also be present, such as the output transformer being either open or defective, speaker jacks being disconnected, speaker wiring deteriorating, or the jacks being rusted so they cannot make proper connections.
An amplifier that isn’t turning on an amplifier that isn’t passing a signal should be distinguished if there is simply no sound emanating from the speakers. If the pilot light is on and you can see the tube glow, the initial power supply works well (i.e., your Amp turns on). Ampensure that the sampler does not transmit any signal and listens attentively in a quiet environment. Audio or otherwise, any auditory indication can be a helpful indicator. When troubleshooting, give yourself every advantage and always listen before assuming the speaker is silent.
If the signal line is broken in a no-sound situation, you should be able to hear sound via the speakers. For example, you can listen to hum, hiss, reverb crash, or bursting sounds when connecting or detaching inputs. Because the signal is frequently disrupted before it reaches the speaker, any disturbances that enter the circuit outside the fault region are transmitted by the speaker.
How Can You Tell If an Amp Is Blown?
Your Amp is blownAmpAmpAmpcknowledgAmpoticeable distortion in the sound, no sound even after turning on the audio system; your stereo system makes bizarre sounds like farting sounds.
If you observe these warning indicators in your vehicle’s Amp, you must know Ampm. Of course, an MP can also Amplify other parts of the automobile audio system. However, the app always affects the overall air quality of the car. Therefore, fixing an amp that has failed is the best approach to improving other components that have been impacted.
The existence of audio systems in your home can occasionally be a mystery, so those above are always blown. A car’s audio system is significantly different from a home’s. Consider how a varied atmosphere could affect the automobile audio system.
How Do I Get My Amp To Work?
You can get your app to work by plugging in the Aamply ConnectAmp and the RCA cables from all the connected devices and re-plugging them after some time.
Ensure the head unit is connected to the Amplifier before turning it on. It is a simple operation if you can access the head unit and the Amplifier. FFirsAmplifiert connects the RCA cables from every device and plugs them in using a new pair. Please turn on the head unit and ensure the volume is at its highest setting, such as the tuner, CD player, or auxiliary. Replace the RCA cables if they all work after removing them from the system and reinstalling them. The AMPD unit, not the Amp, is at the Ampper if you can hear one input, not the stamp.
If it doesn’t work, try connecting the Amplifier to an amplifier not in your car and see if you can get any sound from it. If the Amp can drive, there is an issue with speakers or wiring. If you’re still not hearing anything, the Amplifier may be amplifying. Ensure it’s not set to “subordinate” mode so no filters clash before passing judgment on the unit.
How Do I Reset My Amp?
- Check if the Car Amp is on
- Head toward the trunk and un-screw the remote & power wire points
- Remove both wires and turn off the car’s ignition
- Wait a few seconds so the Amp can reAmp oAAmpf protected mode and then reconneAmpthem again.
Your vehicle amp can become trapped in “protect mode” if not reset after a resolved problem. The warning light won’t go off if you don’t reset theAmplifierr in thAmplifierile. All amplifiers include a safety mode circuit within; if something is short, the Amp will stop pumping a song to prevent any harm to the transistors. The best approach to get a vehicle amp out of “protect mode” is to turn off the 12-volt power supply to the device. You will clear the internal memory, and the computer will pretend it’s disconnected.
What Does a Blown Amp Sound Like?
The blown Amp Sound is like an unpleasant buzzing, scratching, or no sound.
The characteristically unpleasant noise can identify any speaker that has failed to work correctly. It produces a fuzzily distorted crunch that can or can not replicate the signal you are trying to send. One or more of several possibilities can lead to a speaker problem. First, you can damage a speaker’s cone or voice coil.
The damage might be somewhat visible in some cases. The speaker can seem reasonable, but the distortion can be so slight that you question whether or not your Amplifier is amplified in the first place! This post will explain how to determine if your speaker or the Amplifier is Amplifier the problem. It is expected to practice using the phrase “blown” to indicate a malfunctioning speaker. Your speaker can produce a scratchy signal at a low level, or there can be no sound coming out of the speaker. One or more of the following tests can help you identify if the speaker is blown.
How Do You Troubleshoot an Amplifier?
Acknowledge the following steps to troubleshoot an amplifier-
- Carry out a power test
- Find input/output voltage
- Utilize a signal tracing technique that divides the signal into two halves
- Analyze the faults
- Focus on the errored parts that can create faulty output
- Repair
- After turning off the power, replace the faulty component. Make sure it’s working correctly before you turn it on.
The best approach to troubleshooting an amplifier is to start with the most common and fundamental issues. Often, simple problems can be solved in minutes. However, more complex ones can take a long time to solve. Nevertheless, if you start with the most straightforward challenges, you can do much without removing a single soldering plug. As a result, youAmplifierer will be an amplifier, and you’ll save money and won’t have to replace parts that are in good shape.
What Setting ShouldAmp Amp Be on?
The Amp should havAmpewer settings. A decent startiAmppoint sets your bass to approximately 5, giving you a rich sound without being overly muffled. You can also increase the settings more if you want a high sound.
Finding the ideal amp settings for achieving your desired rock sound might be difficult. Your ampAmpuitar and Amp pedals influence how good your amp sounds. Inexperienced musicians sometimes mistakenly believe a highlight-level of locations has a good rock sound. However, many people tend to overestimate their profit margins.
You will not compromise the quality of your tone by using an overdrive or distortion pedal to give it some more oomph. In most circumstances, a gain setting of roughly 6-7 is ideal for most people. So, starting here, you can make any necessary adjustments up or down. It’s good to start with the bass at 5 o’clock, the treble at 4, and Middleddle at 7.
What Does Middle Do on a TTreble? The mid-range frMiddleies are controlled by the Middle of the Amp. We have noticed that the middle level is higher than the high and low start. So start at the center and work your way up or down until you discover a tone you enjoy Amp’sning to.
Your ampAmp’sd-frAmpAmAmp’sis is referred to as Middleddle. While you can achieve a “scooped” sound with a low mid-middle, you can accomplish a beefier tone with a higher mid-middle. Consider boosting Middleddle instead of the highs for a thicker sound without raising gain. Your tone will be more noticeable when you perform alongside other musicians and their instruments.
Why Is My Guitar Not Connecting To the Amp?
Make sure that the amp amp is plugged in and turned on. If you use a mixer, ensure the dump is not mute and that all cords are plugged in.
A reliable amplifier and properly functioning cords are a must at all times. Check if you can plug another guitar into the same line to see if it helps. If you don’t have a second guitar, connect a cable to the amplifier and preamplifier volume by a notch. You should hear a hum when you touch the cable’s end with your finger. There’s a good chance your ampAmplifierd ampAmplifiere is functioning. For this kind of test, keep the loudness low.
Even if you have no sound and have tested the amp cords, sAmps, and indicator light, do you have anything else you can do if you have a System powered by 9 volts? The ES2 features an on/off button near a battery light for the phases. Switches that become middle in the middle of their passage can destroy the power. Flip the swidden in the middle on one side or the other in the soundhole and try again.
How Do You Know If Your Amp Is In PrAmp’s Mode?
If the ampAmp’swer AmpAmp’sartAmp’smp’sg and Amp’sgoes out, the AmpAmp’s protecAmp’sodeAmp’slifiers without an indication for protective mode is rare. To prevent additional damage to the AmpAmplifier’stAmplifier’snents, certain amplifiers enter “amplifier protect mode.” Speakers, subwoofers, cables, or another compoAmp’scan cause the ampAmp’sroteAmpAmp’st tampon.
Take a closer look at the rampart. To begin, disconnect the speaker cables from the amp amplifier. It’s most likely a speaker issue if the amp amplifiers are out. Examine every speaker and subwoofer in the system to find the source of the problem. A faulty speaker might cause the problem. Another option is to check with an ohmmeter to see if any speaker wires or connectors have gone loose or are in direct touch with bare metal.
If you cannot figure out what’s wrong with the speakers, check the RCA patch cords first. Then, connect the Ampr head unit and ampAmping high-amAmpfy RCA wires. Then, replace the RCA wires. iAmphis causes your light to go off.
How Do You Make an Amp Sound Like Nirvana?
If you want your AmpAmplifier soAmplifierNirvana, set the treblMiddleddle to approximately 7-8 and the bass to around 5. If you use a pedal, the chorus should have a lot of distortion between 8-10.
Clean and distorted guitar tones were two different sounds in Nirvana’s repertoire. The lyrics were often basic riffs or single notes played throughout a clean amplifier. Makers applied a heavy distortion to the power chords used in the chorus to create the sound. Two tones are essential if you do want to sound like Nirvana. You can go from clean to distorted in seconds with a foot-switchable amp or a distortion pedal.
The majority of Nirvana’s songs begin and end with a clear tone. However, it’s also pretty full-sounding and twangy. Although the guitar’s single-coil pickups were responsible for the guitar’s twangy brightness, Kurt’s amp settings were also crucial. Although the tone must be bright, it should not be overbearing. Distorted Nirvana guitar tones are gritty yet full-bodied. You’ll need the treble, middle, bass, and distortion to get this balance. Your voice must be both rich and distinct.
How Should I Set My Amp For Metal?
Amp should set the ampAmpr metaAmpAmAmpn (8-10), Bass (7-9), Middle (3-5), and Sample (5-7). It would be best if you cranked up the treblAmpnd gain on your Amp. Amp the maximaAmpddleddle to medium and the treblAmpo medium-high to get a metal sound. To get a deMiddleeTrebleund, you need a treble of low-end, many gains, and a lot of basses.
If you get things right, you’ll be on the way to attaining that distinctive metal tone. Some amplifiers have distinct bass and treble adjustments, while others integrate these middleeters into a single EQ. The bridge pickup works well for metal. Using the bridge pickup instead of the neck pickup will give the guitar a more defined tone, preventing it from sounding muddy. Ensure your AmpAmplifier’seamplifier skies are powerful enough by adjusting the volume and tone dials to their highest settings.
What Does Bass Do On an Amp?
The bass produces audio vibrations on an Amplifier. The vibration is converted to electric signals, which the amplifier processes and sends back to the world as audio from the amp speakers.
Electronic devices known as bass amplifiers make low-pitched instruments, such as the bass, audible to listeners. An amplifier processes electrical signals generated by the bass pickups and sends them back to the speaker as audio. This is why most bass amps are made for electric basses. Bass amplification is a relatively recent development in the history of music. Basses have been used in orchestras for hundreds of years without additional amplification. Solid-body electric basses and bass amplifiers became popular with the rise of rock’.
How Do I Clean My Amp Tone?
Acknowledge the following steps to clean the Amp Tone-
- Select a clean channel or lower the gain if you don’t have more than one.
- Remove any effects and pedals from your AmpAmplifierurnAmplifierle, mid, and bass knobs up to noon.
- Keep the gain at a low level and adjust the volume at an average level.
- Jam for a bit to gain a feel for the tome
- Observe what you like and what you do not like about the tone
- If you hear any issues, begin making tiny modifications
- After you’re satisfied with the tone, you can add additional effects
Achieving a clean tone is the simplest thing you can accomplish with a guitar amp. The gain, EQ, & volume knobs all contribute to the overall tone, so here is an excellent place to start. Additionally, this will underline the necessity of proper pickup.
What Is Drive In an Amp?
Snares strike all four beats of a measureDriveltaneoDrive, creating the rhythmic patteDriveown asDrivee. The drive can also be referred to as the ampAmplifier’sin amplAmplifiererdrive, which can also be caused by pushing an amplifier’s preamp to its limit, leading to damage.
Pushing a preamp’s distortion threshold can generate overdrive using an amplifier or effects device. The term “overdrive” is often used interchangeably with distortion and clipping. It distorts when you put too much level on something and overdrive it. Overdrive and distortion are two unique concepts in the world of guitar.
Distortion usually refers to a buzzing or “fuzzy” sound produced due to excessive distortion in guitar sounds. To a guitarist, overdrive is the guitar’s counterpart of the broad description. It’s a condition of semi-distortion if you will. The concentration of harmonic energy & presence, not to the point of full-blown distortion. This effect can range from a slight breakdown to a full-on distortion by turning the “drive” Ampb on or off the ampAmp preamAmpAmpt Does It Ampn When an Amplifier Clips? Ampen an Amplifier Clips means Limited power supply, voltage asymmetrical output swing, un-regulated linear power supply, and limited filter capacitor.
Clipping is a waveform distortion when an amplifier is overdriven and seeks to generate an output voltage or current above its maximum capabilities. The output power of an amplifier can be beyond its rated value if it is driven into clipping. You can generate high-frequency harmonics via clipping in the frequency domain.
Damage to the tweeter can be more likely due to the signal’s increased emphasis on high frequencies. Even though the distortion caused by clipping is not audible, it can still be seen on an oscilloscope. Clipping, particularly in heavier genres of music, is frequently employed for aesthetic impact.
Why Is MyAmpp Hissing?
Your amp hissing is caused by an oAmpnherent hum in the audio signal, anaAmpaudio equipment, amplifier gain, poor wiring, ground loop, radiofrequency interference, computer noise, or blown speakers.
The most common cause of hissing in a guitar amplifier is anything you’ve done to it. While nothing is plugged in, amplifiers are almost completely quiet. Therefore, an amp needs extra gadgets and connections hooked up to generate noise. Grounding issues, external effects units, faulty cable ends, and overdriven gain settings are all potential sources of hiss. First, locate the problem’s root cause using a method known as elimination.
Speakers can easily be ruined by humming, hissing, buzzing, or other types of noise. Knowing the sources and remedies for speaker noise problems is essential. Proper wiring, ground loops, or other electromagnetic interferences usually cause speaker hum, hiss loops, or other electromagnetic interferences. However, some noise is inherent in the audio stream (tape hiss, amp boost, etc.). It would be best to eliminate interference before eliminating the noise.
How Do I Stop My Amp From Hissing?
You can stop the amAmprom hisAmpAmpy, lowering your volume control, and yame. First, make sure your instrument is in working order. If the hiss persists even after you’ve ruled out cables, effect units, and amp settings, try adjusting the guitar master volume knob up and down if the hiss goes away when you lower the guitar master volume.
Check the power wires for your guitar. Instead of using an extension cable, connect the Amplifier direcAmplifiere wall socket if you need to go a long distance. Replace the extension cord if the hiss is no longer present. If, despite plugging it into a wall socket, your AmpAmplifierntinues, you may need to replace it. Plug the AmpAmplifier into the Amplifier wall outlet on the other side of the room. If the hissing stops, the problem is most likely with the wall socket. There is a problem with grounding the wall socket or external cord.
After verifying the wires, effects, and wall socket, turn on your ampAmpourAmpAmpAmpntroAmp’sy is causing the noise. You should Amper have your gain control set higher than your volume control. Ampr-driving the ampAmp an AmpAmpAmp that your volume knob is placed higher thanAmpe gain. Hiss should go away if you reduce your volume control by more than your gain.
How Do I Get Rid Of Static Noise In My Amp?
Reduce the stamp noise in the ampAmp tuAmpAmpAmp the Oise control knob clockwise. Next, adjust the Amp threshold knob until you heatAmpatic from the ampAmpAmp depending on your guitar and ampAmplifierou can amplify the perfect volume.
A guitar with too much amplification is prone to feedback. The input signal is amplified by max gain until the output reaches its highest possibility. If your ampAmp gAmpars Amp is impressively loud, you can be causing feedbackAmpt’s good to have at least two knobs on the guitar face. The profit should be one of these. Reduce the benefit by turning it counter-clockwise. To avoid feedback, set your amp’s and guitar’s gain knobs to no more than three-fourths of their maximum. If the problem persists, try lowering the volume even further.
Try lowering your guitar’s volume control level while increasing volume. In the AmpAmp’sse, the output will be increased while the input will be decreased, and you will avoid feedback. Changing the volume of your song with the guitar’s volume knob can result in immediate feedback, so it’s best to use the amAmp’svolumeAmpAmp instead.
On the guitar’s body, there Amp’sd be another knob that controls the volume. Reduce the volume by twisting it in the opposite direction of the arrow. Some guitars include a scale of one to ten to indicate their loudness. If yours doesn’t, crank it up to eight. If your guitar’s knob is broken, you can be able to get a replacement from a guitar shop. However, you might have to fix it if it doesn’t work.
Why Does My Amp Sound Fuzzy?
An amp made of tubes tends to sound fuzzy. Correspondingly, a tube amp will sound fuzzy if the signal path is distorted, including power amp distortion, output transformer distortion, power supply sluggishness, and speaker distortion.
If the instrument made a rumbling sound, you could blame a defective output tube. You can check this by tapping each tube with a drumstick or other non-electrical stick. Assuming the crackling is coming from the tube, the muddy sound you hear most likely stems from that tube. You should eliminate the sounds in your tube amplifier if the defective output tube is replaced with a new one. A better approach would be to replace the complete set of output tubes to ensure they are all the same brand and age to function at their peak. If this doesn’t cure the problem, you should do a diagnostic on your tube amplifier or get expert assistance.
Interference or a soiled connection can also produce muddy tube amp noises. You should also inspect the connections on the tube amp’s sockets to see if there is a filthy connection. You’ll hear a static sound if any of them are unclean. You can use a moist cloth to clean dust and debris from the tube amp’s unclean connections or a tiny brush to get into the nooks and crannies. You can eliminate static and muddy noises by playing the tube amp with clean connections.
Why Is My AmpAmpackling?
Your ampAmppcrackingAmpcause the power tubes are defective. FirAmp, try switching them one at a time with a spare tube. I checked the preamp plate and cathode resistor. If this does not fix the crackling sound,
Distracting noises interrupting the soundtrack of a movie or music video can be a real pain in the neck. A cracking sound from a speaker is a common symptom. I can attest to the annoyance as someone who has encountered a similar situation. So naturally, you’d like things taken care of right away. However, it would be best if you first comprehended why it happened.
Crackling in the speakers is nearly often the result of a faulty audio connection. An errant wire somewhere between the ampAmplifierd sAmplifieriver causes the driver to shift suddenly, resulting in noise and distortion. As a result, fixing a faulty connection might be tricky. First, ensure the Amplifiers and amplifiers are correctly connected by visually inspecting them. If the wire is often shifted, you can have a problem, possibly with a cat or dog. Make sure to examine the connections even if there is no reasonable cause. They are jumping forward to address the isandelearningea rnsimplyeembarrasss youed.
What Are The Symptoms Of a Bad Output Transformer In a Tube Amp?
The symptoms of a lousy output transformer in a tube amp are Dead Amp, No Audio, Weird Noises, Hum & Buzz noise, power tube red plating, etc.
Some of the more difficult-to-diagnose intermittent problems caused by loose or dirty tube socket pins include complete loss of signals and red plating due to the loss of bias voltage, noises crackling, popping, weakening, and thinning of the signal output, higher-than-average plate voltage, and zero voltage on the AmpAmplifierhe ampAmplifierms more than previously heard, odd noises that come and go, low power, and sound. It’s unfair that the AmpAmplifierquires maintenance.
Conclusion
Amplifiers are excellent audio products for guitars. The primary parts of amplifiers and home audio are the preamp, power amp, and speaker. Your preamp is responsible for transforming the audio signal into an electrical one. Adding voltage to the preamp’s electrical current lets your power amplifier transfer the signal to your speakers.
As a result, the speakers cannot create sound if the power amplifier has a problem. An amp’s location and defective portion determine how difficult it is to fix it. We hope Ampu must have acknowledged why Ampour’s Amp is not working.


Learn more about authors in Nimblefreelancer's team biography page.
- 6 Proven Ways SaaS Founders Actually Get Customers (With Real Examples) - December 17, 2025
- Facebook Ads to Get Followers! - December 27, 2024
- ClickUp vs. Slack - December 20, 2024