No introduction is needed for Adobe Illustrator. However, if you are familiar with Adobe products, you must also be conversant with Illustrator. Adobe Illustrator, on the other hand, is a vector graphics program. Using Adobe Illustrator, you can create art, design, and more. There are many features and tools in the program.
However, even the most experienced Adobe Illustrator users aren’t familiar with all of Illustrator’s capabilities. For example, the Perspective Grid is a hot topic. Most likely, you’ve arrived here to understand better how to use the perspective grid tool. In this post, we will acknowledge everything regarding Perspective Grid in Illustrator.
How To Create a Rectangular Grind In Illustrator?
Click the rectangle grid tool in the tool panel. Once the pointer becomes a crosshair, drag it on the artboard. Select a color from the colors area. Click and drag the artboard, and leave the mouse when the grid size is according to your conditions.


Right-click on the Line segment tool icon and then select Rectangular Grid from the context menu after you do this. It will bring up the Rectangular Grid Tool Window. Use this window to change the number & skew of the dividers in the grid. Finally, click the “OK” button to confirm your dimensions. Choose the Rectangular Grid tool by searching for it. You may find the Line Segment tool in the toolbar just on the left side of the screen. Using the Line Segment tool, right-click and choose the Rectangular Grid tool.
Adjust the grid settings on your computer. When the Rectangular Grid Tool Options window is loaded, you can open it by clicking anywhere on your artboard. The “Default Size” tab is where you’ll input the dimensions of your grid. For horizontal and vertical grid dividers, fill in the appropriate tabs.
The grid should have fewer rows and columns than the number of columns you entered. The skewness of the grid’s horizontal & vertical lines may also be adjusted using the sliders under the tabs. Your grid design has been completed. In the Rectangular Grid Toolbox, click the “OK” button at the bottom to save your selections and exit.
How do you get rid of the perspective grid in Illustrator?
Press the keyboard shortcut “Ctrl + Shift + I” to eliminate the perspective grid in Illustrator in Windows.
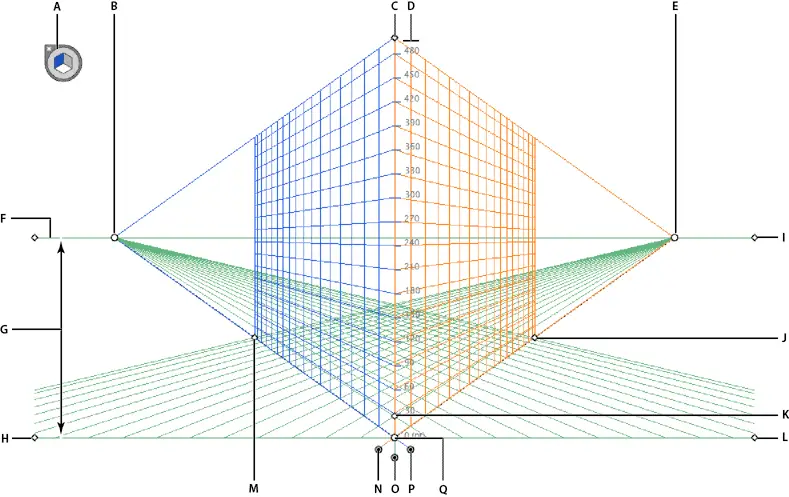
The Perspective Grid in Illustrator CS5 makes creating artwork with a complete sense of perspective easier. The Perspective Grid allows you to define one, two, or three vanishing points. You can interact with the vanishing points to move them in different directions. The tool can also be used to build new items and place existing things into perspective.
Please remember that Perspective Grid is a feature in Illustrator. Even though the tool is visible whenever the artwork is done, it will not be a part of the final product. Snap to the grid may be switched on or off, and you could remove individual items from the grid. The grid can be engaged or deleted.
Acknowledge the following steps to get rid of the perspective grid in Illustrator-
- Click “View” from your menu bar and choose Perspective Grid / Hide Grid from the drop-down menu to turn off the grid.
- Go to the Perspective Grid menu and choose “Snap to Grid.”
- Select “Object” and “Perspective / Release with Perspective” from the drop-down menus. While using the grid, you will not reverse perspective alterations made by removing an item from the grid.
- How to Hide Perspective Tool in Illustrator?
- Acknowledge the following steps to hide the perspective tool in Illustrator-
- Go to the “View” menu.
- Click on “Perspective Grid”
- To hide the grid, select “Hide Grid” from the menu.
How Do You Manipulate Perspective in Illustrator?
You can manipulate perspective in Illustrator using the Free Transform tool. Select Viewpoint Distortion from the flyout menu, and then manipulate the anchor points to change the object’s perspective. The tool will open in a new window.
The free transform tool works like magic. A few mouse clicks are all it takes to change the image’s perspective, rotate text, or straighten several items. This innovative and adaptable tool is beneficial for modifying artwork, such as a basic snapshot or a character animation. As a bonus, the free morph tool in Adobe Illustrator makes distorting perspectives much more accessible.
On the other hand, Adobe Illustrator and Other vector tools deal with distortion differently. For example, to change an object’s perspective in Affinity Designer, you need to apply a path effect, but Inscape doesn’t support it. Using Illustrator’s perspective toolkit, it is now possible to produce more imaginative and visually stimulating artwork.
Let’s take a look at how to alter Illustrator’s viewpoint now. To change the text’s viewpoint, you must first construct text outlines. Next, select the text and then choose Type> Create Outlines. Next, select the object, then choose the Free Transform Tool from the toolbar.
How Do You Edit the Grid in Illustrator?
Acknowledge the following steps to edit the grid in Illustrator-

- Click “Edit” in the drop-down menu.
- Select “Preferences”
- Click “Guides & Grids”
- You can adjust line color, Grid Style, Grid Line Spacing, and Number of Subdivisions in the Grid window. In addition, you may choose whether or not to display a pixel grid while zooming in on the artboard.
- Click Okay
You’ve probably gotten the gist of what a grid is. However, why should you care about it or even put it to use? Grids are an excellent choice to achieve harmony among them because they ensure that the visual elements complement one another. In addition, they advise you on how to connect various pieces on the artboard and, most importantly, how to organize them.
Working with grids has many other benefits, such as generating pixel-perfect artwork on digital devices. However, before discussing the necessity of using the grid to create crisp artwork, I have to briefly discuss some fundamental features of how pictures are formed on the two distinct mediums (screen and print).
How Do I Change the Rectangular Grid in Illustrator?
Acknowledge the following steps to change the rectangular grid in Illustrator-
- In the Tools panel, select Rectangle Grid.
- The pointer transforms into a crosshair that you may drag over the canvas.
- Choose a color for the Stroke in the Tools panel’s Colors section.
- When the grid size you require is achieved, release the mouse button.
- Once the grid reference point is selected, you can enter a width and height for it to specify how many horizontal and vertical dividers you want to have.
- Use the Outside Rectangle to replace segments with a separate rectangle object and the Fill Grid check box with your current fill color.
- Click OK.
Create a polar grid by selecting one of the grid tools in the Tools section. When using the Rectangular Grid tool, you may design rectangular grids with a certain number of horizontal & vertical divisions. Using the Polar Grid tool to build concentric & radial dividers of a predetermined size and number is possible.
How Do You Reset the Rectangular Grid Tool in Illustrator?
To reset your rectangular grid tool in Illustrator, choose object> transform> Reset Bounding Box.
It is possible to build rectangular grids in Illustrator using the Grid Tool. They are composed of rows and columns that are translucent, detachable, and resizable. These grids allow the user to create artwork and things that are both exact and error-free. It’s common for the grid tool to be used in conjunction with the ruler tool to ensure precise measurements of designs. In addition, the user can change the number of rows and columns in the grid.
How do you turn off Snap to Grid in Photoshop?
To turn off the snap to grid in Photoshop, Go to View> Snap & Click Disable Snapping. You can also turn off the snap to the grid by holding down Command/Control.
On the other hand, you may turn off grids and guidelines in Photoshop. Some people appreciate the features of Snap To, and others don’t. The View menu gives you complete control over whether or not to use snapping. Some people choose not to use the snapping feature since it allows them to arrange items freely. However, even the tiniest movement of your snapping item may prohibit you from positioning your object exactly where you want it, particularly if the grid is not aligned with the region in question.
How to Undo Perspective Grid in Illustrator?
You can undo the perspective grid in Illustrator using the plan switching widget or the view menu.
A ‘Plane Switching Widget’ in the screen’s upper left-hand corner lets you switch between different perspectives. 3D boxes will be rounded and flattened down. You’ll see an ‘X’ or ‘Cross’ icon in the widget’s upper-left corner. So, hover your mouse cursor over the widget & click on the ‘X’ symbol to remove it. When you place your cursor over the ‘X/Cross’ icon, the’ Hide Grid’ box will appear. By clicking on it, the perspective grid is removed from view. You may use the ESC key to remove any perspective grid for those who prefer a more manual approach.
Acknowledge the following steps to undo the perspective grid in Illustrator –
- Using the ‘View’ Menu.
- Select the ‘View’ option and Press Enter to open the menu.
- Now, choose ‘Perspective Grid’ from the drop-down menu by moving the mouse cursor.
- As a result, a new drop-down menu will appear, including a few additional choices.
- Use the ‘Hide Grid’ option to hide the grid from the menu.
- A Perspective Grid can be undone using the same approach.
How Do You Change the Perspective of Text in Illustrator?
To change the perspective tool of text, Select the Perspective Selection Tool and click the “Edit Text” icon. You may modify the Type and color of the perspective text in Illustrator as you usually want. And when you exit Isolation Mode, you will reflect those changes on the grid.
How Do I Add Perspective to a Shape in Illustrator?
You can add perspective to a shape in Illustrator by simplifying the curves, adding dark shadows, and creating shadow gradients.
Clicking on a few curving forms will cause them to be divided into two halves. If you don’t already have the Pathfinder Panel, press Shift + Ctrl + F9. Holding down the Shift key, click on one side of the screen and then the other. Expand the Pathfinder Panel by clicking the Unite command. It will result in a new form combining the previously existing ones. Repeat with the remaining curved shapes.
Choosing which side will get the light source is the next step. We’ll utilize the light source on the right because it’s already there. As a result, the deepest yellow will be used for the text’s bottom and left sides, with the left sides being the most prominent. Our deepest yellow and blue can be used on the text’s left borders.
Let’s get started with some gradients. If you haven’t previously, open the Gradient Panel by pressing Ctrl + F9. Select both the brightest and second-brightest yellow color swatches, then drag them to the left and right sides of the gradient, respectively. Click and drag the gradient to the Swatches Panel. Create a gradient similar to the previous one using the yellows in the middle and the darker ones.
A second yellow gradient has been added to your palette. Pick it and click the gradient color swatch button to use gradients on a specific item. The blue gradients are the same as the red ones. The brighter regions of both words should now have a gradient applied to them. Our color gradients aren’t based on an exact science; instead, we’re trying to make objects stand out and give them subtle differences in illumination.
Conclusion
A grid is indeed a way to organize and comprehend your thoughts. Drawing using different grids, such as square, isometric, and dot (pun slightly intended) is possible. In a two-dimensional space, perspective grids provide a three-dimensional framework. The perspective is so realistic that it draws your attention directly to the “far end” of the paper, the focal point, aka the vanishing point.
However, you must also become familiar with the 2D/3D system and train your hand and sight to work through the visual trickery of paper wormholes before using them effectively. We hope you have acknowledged everything regarding how to get rid of the perspective grid in Illustrator.


Learn more about authors in Nimblefreelancer's team biography page.
- 6 Proven Ways SaaS Founders Actually Get Customers (With Real Examples) - December 17, 2025
- Facebook Ads to Get Followers! - December 27, 2024
- ClickUp vs. Slack - December 20, 2024