When it comes to paving a basketball court, several factors must be considered. The court aspect is crucial in creating a safe and durable playing surface from the materials used in the court’s layout. Whether you’re an avid basketball player or simply looking to create a new recreational space, here’s a step-by-step guide on how to pave a basketball court.
How to Pave a Basketball Court?
- Plan the location and size of the basketball court
- Determine the location of your courtside based on the size and layout of your court in the space available.
- Check local zoning regulations and building codes, if applicable.
- Make the design of the court dimensions and lines.
- Sketch the court design, marking dimensions for the full court-court line, key, and three-point line.
- Decide on the type of surface material (asphalt or concrete are most common).
- Materials & Tools
- Purchase or rent necessary materials and tools: surface material, paint or court kit, hoops, leveling tools, compactor, etc.
- Preparation
- Clear the designated area of debris, rocks, and vegetation.
- Level the ground if necessary.
- Installation
- Lay a sub-base of gravel for drainage, then compact it.
- Pour the surface material (asphalt or concrete) and ensure it’s flat and even.
- Allow the surface material to cure for the necessary period. This may take several days.
- Marking
- After the surface has cured, apply the court markings using your design.
- Paint the lines and allow them to dry.
- Basketball Hoop Installation
- Install the basketball hoop(s) at the appropriate locations on the couture. Make sure they are securely fastened and at the right height.
- Finishing Touches
- If desired, seal the surface for additional protection.
- Clean the court the first use.
Plan the location and size of the basketball court
- Determine the Location of Your Court
- First and foremost, identify where you want the basketball court to be located. It could be your backyard, a dedicated space in a community center, a school, etc.
- Choose a spot that’s flat or can be made flat relatively quickly, as this will save work during the installation phase.
- Also, consider factors such as sun direction, wind patterns, and proximity to your house or other structures. You wouldn’t want to place it where the sun is always in players’ eyes during critical play times or where errant balls might damage windows or other property.
- Decide on the Size and Layout of Your Court Based on the Space Available
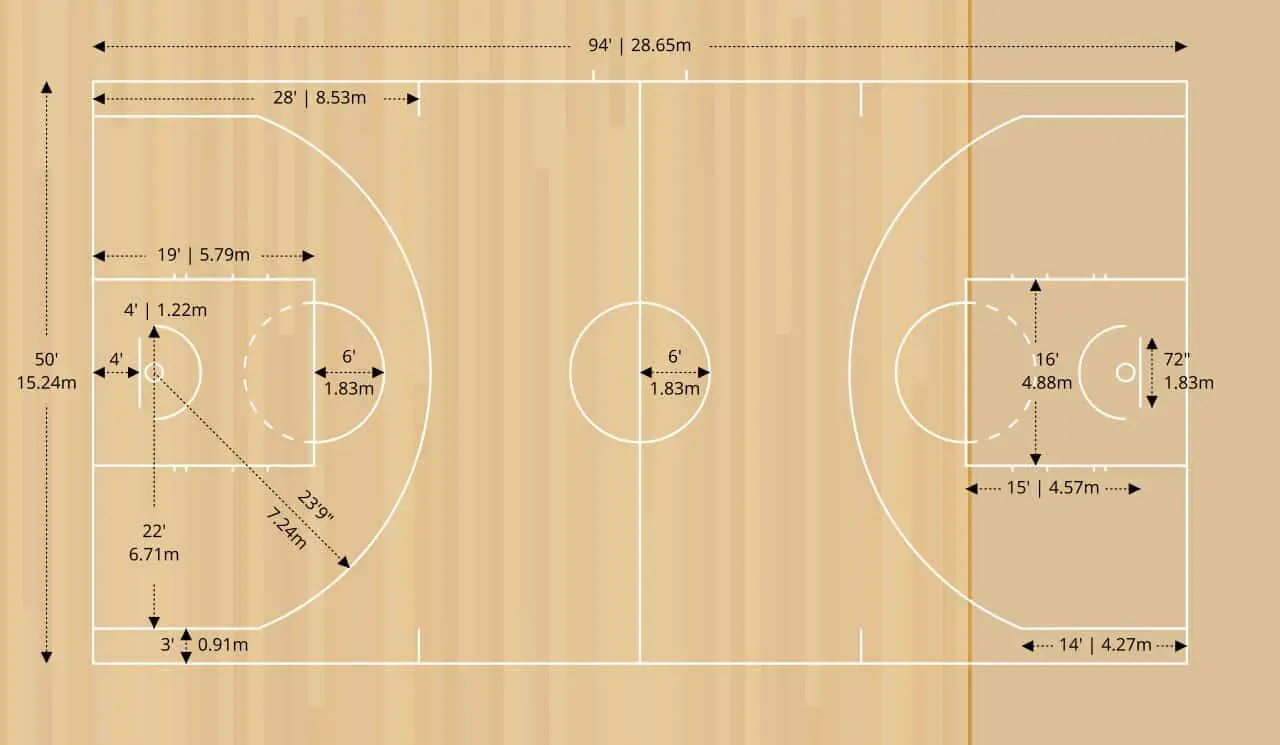
- The size of your court largely depends on the space you have available. A full-size basketball court is 94 feet by 50 feet, but you may not have enough space for this.
- If you’re short on space, consider a half-court setup instead, which is typically 47 feet by 50 feet.
- Ensure you have enough room around the court’s edges for safe play. It’s recommended to have at least 2-3 feet of clearance around the entire crutch out a diagram of your concluding the position of the hoop(s), the free-throw line(s), the three-point line(s), and any other lines or zones you want to include.
- Check Local Zoning Regulations and Building Codes
- Before starting any construction project, check with your local government to determine whether zoning regulations or building codes could affect your plans.
- Some areas may restrict the size, location, or even the lighting of outdoor sports courts. In some cases, you might also need a building permit.
- Also, consider homeowner association rules if you live in a managed community.
- These steps will ensure you’re not violating any rules and could save you from making costly changes.
Make the design of the court dimensions and lines
- Sketch the Court Design and Mark Out the Dimensions
- Start by drawing a rectangle to represent your courting area. A full-sized court is typically 94 feet long and 50 feet wide, but you can adjust this to fit your available space. If you’re building a half-court, the length is typically halved to 47 feet.
- Divide your court lengthwise to indicate the mid-court line. This line is crucial for starting possessions and determining where players can move on inbound plays.
- The key, also known as the free-throw lane or the paint, is a rectangle at each end of the court FIBA and NBA dimensions; this area is 16 feet wide, extending 15 feet from the backboard. The free-throw line is part of this rectangle, positioned 15 feet from the plane of the backboard.
- Draw the three-point line. For a professional-sized court, this is typically 23 feet 9 inches from the center of the basket to the farthest part of the arc and 22 feet at the corners. High school courts usually use a uniform distance of 19 feet 9 inches. These dimensions can be adjusted to suit your preference and the players’ skill levels.
- Don’t forget to include the out-of-bounds areas, typically a few feet wide around the entire playing area.
- Decide on the Type of Surface Material
- The surface material you choose will impact the court’s look, playability, and maintenance requirements.
- Asphalt is a common choice for outdoor courts because it’s durable and relatively affordable. However, it can be prone to cracking over time, especially in areas with freeze-thaw cycles.
- Concrete is another option. It’s more expensive than asphalt but more durable and less prone to cracking. Due to its heavy weight and the precision required in leveling, concrete requires professional installation.
- The choice between these two materials will largely depend on your budget, the skills and resources available for installation, and the specific conditions in your area.
Once you have your design sketched out and your surface material is chosen, you’re ready to move on to the next steps of the process: gathering your materials and beginning the construction work. Remember, these plans can be adjusted as needed, and it’s always a good idea to consult with a professional or experienced DIYer if you’re unsure about any part of the process.


Materials & Tools
- Surface Material
- This is usually concrete or asphalt, depending on your preference. For a concrete court, you’ll need ready-mix concrete, while for an asphalt court, you’ll need hot-mix asphalt. The quantity will depend on the size of your court or court marking kit.
- You’ll need paint, that’s the spec. It was initially designed for use on outdoor sports courts. The colors will depend on your preference, but white is commonly used for the lines, with other colors used for the key or other marked areas. Make sure to get a non-slip variety for safety.
- Alternatively, you can use a court marking kit, which includes a stencil and paint, to make it easier to apply the lines and markings accurately.
- Basketball Hoops
- The type of hoops you need will depend on your specific requirements. You can use in-ground systems for a more permanent and stable setup or portable ones that allow flexibility.
- Ensure the backboard and hoop are of good quality and the correct size. For a regulation-size court, the hoop should be 18 inches in diameter, and the backboard should measure 72 inches wide by 42 inches tall.
- Leveling Tools
- A level, a long straightedge, and stakes will be needed to ensure your counterfeitly flat. This is important for the safety of the court and its playability.
- Compactor
- A plate compactor compacts the base and surface materials, ensuring a solid, durable surface. These can usually be rented from home improvement stores.
- Other Tools and Materials
- You’ll also need standard construction tools such as shovels, rakes, wheelbarrows, and a concrete mixer if you’re using concrete.
- For base preparation, you’ll need crushed gravel or similar material.
- To install the hoop, you might need cement, depending on the type of hoop you choose.
- Depending on your choice of surface material, you might also need a sealant to protect the court surface.
Before starting the project, calculate the quantity of each material you need based on the size of your court product specifications. Always order a bit extra to account for waste or mistakes. Once you have all your materials and tools ready, you can move on to your basketball court project’s preparation and installation stages.
How do you prepare before you pave the basketball court?
- Clear the Designated Area of Debris, Rocks, and Vegetation
- This involves removing any objects that could obstruct the installation process or destabilize the court surface.
- Begin by picking up visible debris like trash, branches, rocks, etc.
- If there’s any vegetation, it will need to be removed. This could be as simple as mowing short grass, uprooting plants, or removing trees.
- After uprooting plants or trees, remove all the roots from the ground to prevent future growth that could disrupt your court of the Ground If Necessary.
- Once the area is cleared, leveling the ground is next. This is essential because. An uneven basketball court can lead to improper ball bounce and player injuries.
- Begin by assessing the level of the ground. You can do this by using a level or visually inspecting the area.
- If the ground is uneven, you must either add soil to low areas or remove it from high places. Depending on the size and state of the region, this can be a labor-intensive process and may require machinery.
- Once the ground is roughly level, compact it using a compactor. This is essential to create a solid base for your court. Courtally, recheck the level. You’re aiming for a perfectly flat surface, so take your time and adjust as needed.
Remember, thorough preparation is critical to a successful project. The better you prepare the ground, the better your final basketball court will be. It’s also important to note that large or complex leveling projects may require the help of a professional to ensure safety and accuracy.
Basketball Court Installation
- Lay a Sub-Base of Gravel for Drainage, Then Compact It
- This step involves creating a solid, stable base for your court and also provides necessary drainage.
- Start by spreading a layer of crushed gravel or similar material over the entire court area. The layer should be about 4 to 8 inches deep, depending on the size of the court and the type of soil in your area.
- As you spread the gravel, ensure it’s even across the entire court area. You can use a rake or shovel to move the gravel around.
- Once the gravel is spread, use a plate compactor to compact it down. This creates a firm, stable base that will support the weight of the court surface and the players.
- Pour the Surface Material (Asphalt or Concrete) and Ensure It’s Flat and Even
- Depending on your choice of surface material, this step may require professional assistance.
- For an asphalt court, hot-mix asphalt is spread over the gravel base and then compacted. This is typically done using an asphalt paver and roller, which are specialized pieces of equipment.
- For a concrete court, the process is slightly different. First, wooden forms are placed around the edges of the court area to contain the concrete. Then, the ready-mix concrete is poured into the area. The concrete should be spread and smoothed using a concrete float.
- In both cases, the surface must be as flat and even as possible. Use a long straightedge to check the flatness and make adjustments as necessary.
- Allow the Surface Material to Cure for the Necessary Period
- This is a critical step that can’t be rushed.
- Concrete typically needs about a week to cure fully, although it can take longer in cold weather. During this time, it should be kept damp to prevent it from drying out too quickly, which can lead to cracking.
- Asphalt usually doesn’t need as long to cure, often only a few days. However, heavy objects and vehicles should be cleared during this time to prevent indentation or damage.
- In both cases, the surface should be kept clean and debris-free during curing.
Once the surface has fully cured, you can move on to the final steps: painting the court markings and installing the basketball hoop(s).
Marking
- Apply the Court Markings Using Your Design
- Referring back to the design and dimensions you sketched in the planning phase, begin marking the lines on the court lines you’ll need to draw, including the boundary lines, the mid-court line, the free-throw lines, the keys, and the three-point lines.
- You can sketch the lines before you paint using chalk or a similar temporary marking tool. A long, straight edge or a string line can also help you ensure the lines are straight.
- For the arcs of the three-point lines and the top of the key, you might find it helpful to use a makeshift compass. This can be as simple as a string tied to a piece of chalk at one end and anchored in the middle of the circle at the other end.
- Check and double-check your measurements before you proceed to paint. It’s much easier to adjust chalk lines than painted ones!
- Paint the Lines and Allow to Dry
- It’s time to paint once you’re satisfied with your chalk markings.
- Use paint specifically designed for outdoor sports courts. This will ensure it’s durable enough to withstand weather and play.
- You can use a paintbrush, a roller, or a paint sprayer, depending on what’s available and what you’re comfortable with. Some people find a paintbrush gives them the most control for straight, crisp lines.
- Ensure the paint is thick enough to be visible but not so dense that it creates a tripping hazard or interferes with the ball’s bounce.
- Once all the lines are painted, allow the paint to dry thoroughly. This will likely take a few hours but could be longer, depending on the weather and the type of paint.
- Avoid walking on or playing on the court until the paint is fully dry to prevent smudging the lines.
With the lines painted, you’re nearly finished. The final step is installing the basketball hoops and other equipment you use. After that, your court will be ready for its first game!
Basketball Hoop Installation
- Install the Basketball Hoop(s) at the Appropriate Locations on the full-size court; you will need two basketball hoops placed at each end of the court. For a half-court setup, you will only need one hoop.
- The location of the hoop will need to be precisely on the baseline (the shorter end of the rectangle forming the court’s hoop should be centered in the width of the court, which means it should be equidistant from each sideline.
- Depending on your basketball hoop type, installation may involve digging a hole and cementing the pole into place, attaching it to an existing wall or structure, or assembling a standalone system. Follow the manufacturer’s instructions closely.
- Ensure They Are Securely Fastened and at the Right Height
- Safety is paramount when installing basketball hoops. Ensure the hoops are firmly attached, and check all screws, bolts, and other fasteners to ensure they’re tight and secure.
- The rim of the hoop should be exactly 10 feet from the ground. Use a tape measure to check this. If the hoop is adjustable, set it to the correct height.
- The backboard should be mounted so that its lower edge is 9 feet 7 inches from the ground, leaving a 6-inch gap between the bottom of the backboard and the top of the hoop.
- After the hoop is installed, check its stability. Give the backboard a little shake to ensure it is secure and does not wobble. If the hoop does not feel safe, additional reinforcement may be required.
With the hoops installed, your basketball court is complete and ready for play. Before you start playing, make sure to do a final inspection of the courting to ensure all lines are clear and all equipment is secure. Regular maintenance, like keeping the surface clean and regularly checking the condition of the hoops, will help ensure your court is in good shape for years to come.
Conclusion
Paving a basketball court is a complex process that requires careful planning and preparation. Every step, from the ground preparation to the final touches, is essential in creating a safe and durable playing surface. By following these steps and investing in regular maintenance, you can make a basketball court that will provide endless hours of enjoyment for years to come.


Learn more about authors in Nimblefreelancer's team biography page.
- 6 Proven Ways SaaS Founders Actually Get Customers (With Real Examples) - December 17, 2025
- Facebook Ads to Get Followers! - December 27, 2024
- ClickUp vs. Slack - December 20, 2024