
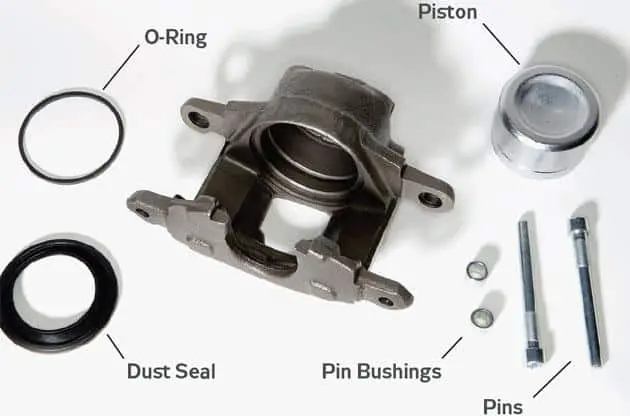
Inquiries from people asking for my advice on pushing back the brake piston without a tool have increased. I’ll show you how to accomplish it quickly and easily in this post. Brake calipers are the most commonplace to find brake pistons. These components are critical to the operation of your vehicle’s braking system. Stopping power is provided by brake pistons in your automobile, which works with brake pads and brake discs. Steel, rubber, or aluminum can be used to make these pistons. Pistons are found in both fixed and floating brake calipers. A caliper on most modern automobiles has six pistons.
The master cylinder pushes brake fluid through your vehicle’s braking system to the brake caliper when you press the brake pedals. It causes the brake pads and disc to touch the caliper. Disc brakes, far superior to drum brakes, are seen on many newer vehicles. Unfortunately, brake pads lose some of their braking power with each contact with the revolving disc; as a result, they begin to wear down. The brake piston will emerge from the caliper to make up for this. You will ultimately need a new brake pad because of this. However, due to the wholly expanded caliper piston, it may be difficult to change the brake pads at this stage. This post will acknowledge how to compress the brake piston without a tool.
How to Compress Brake Piston Without Tool?
You can Compress Brake Piston Without a unique extension tool using a screwdriver, an old channel lock or C-clamp, or a 29-ounce smooth rod caulk gun.
Your vehicle’s braking system houses the piston, which is positioned within. Your vehicle’s lug nuts should be loosened but not totally. Then use a jack to lift your car carefully. To prevent the jack from falling, place it on a stable surface. The lug nuts and wheel assembly should be removed entirely when the car is hoisted up.
Detach the brake line from the caliper by loosening it. Set aside the banjo bolt and sealing washers. Both methods are OK, but one is preferable since it is more secure and does not allow liquids to seep out of it. This fluid is highly corrosive, so be careful not to touch your skin and your vehicle’s body. After removing the caliper’s mounting nuts, lift the caliper away from its revolving disc (rotor) by lifting it. If necessary, you can use a screwdriver to aid in the caliper removal process.
You should be aware that the rear caliper piston differs significantly from the front caliper piston in most current automobiles. You may compress only front pistons, and only rear ones are available. Compressing the fronts with a c-clamp causes the piston to move in. You did not harm! In most cases, if you try to do this for the caliper pistons in the rear of most automobiles, you’ll end up in a heap of problems.
You will need an essential instrument like a plier or a screwdriver to correctly push back the rear caliper brake piston. To replace your brake pads, you must turn the piston counterclockwise to slide into the caliper’s housing. Put the plier in the grooves where the accurate tool goes & gently rotate it clockwise to secure it to the piston.
Eventually, you’ll observe the piston advancing into the caliper’s piston port. Once the piston is fully inserted, keep turning the handle clockwise. By inspecting the seal, you can tell if the piston is fully encased. As a result, the seal will be flush with and lower than the piston. So now that you know that piston has fully retracted, you may proceed with removing and replacing your vehicle’s brake pads.
How to Turn Brake Caliper Piston?
You can turn the brake caliper piston using the brake caliper tools & Using C-clamp.
Remove the brake caliper to begin. It will be necessary to disassemble the brake caliper after removing it from the bike. Remove the two main bolts and the two internal hex bolts to split the caliper in half. Start on the side that doesn’t have the bleeding. Secure the caliper half in the vise, careful not to enclose the piston in the jaws. You can use the C-clamp to compress the piston to hit the caliper body at its lowest point. The old fluid will be discharged from the caliper if you’re not careful. To remove the dust seal, loosen the clamp holding it in place.
Use a pick to remove the caliper’s dust seal. It will take some time and effort to accomplish this goal. It’s challenging to pressurize the outer-side caliper because of the two holes—one where the line attaches and another where it crosses over to the opposite half. First, the crossing gap must be closed. 0.020-inch-thick metal will suffice for this task, which you can do with just one piece of aluminum. Drill two holes that correspond to the caliper’s two bolt holes. The bleeder-side caliper half can be used as a template to establish the location of the holes.
Using the old center caliper seal, place a seal over the caliper’s crossover hole. It is possible to attach the block-off plate to the caliper utilizing two significant and little bolts. However, tighten the block-off plate with big hex nuts because internal hex bolts are too lengthy. While attaching the plate, a modest amount of grease might be used as a temporary seal.
Do not tighten the C-clamp on the caliper after removing the dust seal and placing the block-off plate. To prevent the piston from flying across the shop, I utilize the clamp as a safety measure during the following phase. You can use Rubber-tipped blowguns to remove the brake lines from a vehicle’s wheel wells.
To ensure a tight seal, keep the air cannon in position. Slowly exert pressure on the piston, allowing it to dislodge under the air force. Apply heat to the caliper half until the piston begins to budge. It’s important to remember that the C-clamp is there to prevent the piston from exploding. Adjust the c-clamp so that you may altogether remove the piston. The old brake fluid in the caliper is also under pressure, so be careful.
The plate and seal may be removed from the caliper half with a bleeder once the piston is entirely removed. Repeat the preceding procedures, omitting the block-off plate to remove its bleeder side piston. After securing the bleeder, place the blow gun’s rubber tip into the caliper crossover port. The C-clamp must not be overlooked! Once the pistons have been removed, the rest of the brake restoration may begin. Almost any brake caliper, single or multi-piston, may be repaired.
Why Won’t My Brake Caliper Piston Compress?
Due to corrosion, worn boot or sales, Collapsed Brake hose, or incorrect wind back procedure, the brake caliper piston won’t compress.
A corroded or rusted caliper piston produced by an improper piston boot is the most common reason for a faulty caliper piston. Consider the possibility that the wrong wind back process is performed if it’s the rear piston. The caliper piston often doesn’t move because the piston is covered in corrosion or rust because of a broken boot. In corrosion or rust, the brake calipers cannot function effectively. You can compromise the caliper pistons’ ability to compress with any amount of corrosion. If you’re a frequent driver, you’re unlikely to be affected by this. Corrosion may occur if the boot is somewhat damaged by idleness and driving on rainy or salty roads.
The piston seals wear out over time. The piston will eventually become stuck if the seals fail. The piston’s rubber boot, which protects and lubricates it, may also be blamed. Whenever the rubber is torn or broken, water will seep into the piston and cause it to jam. The hose is frequently to blame for a seized brake caliper. Brake fluid leaks onto the piston when the hose cracks or breaks. The caliper will stick because it can’t get back to the master cylinder where it should be. However, there are situations when the caliper isn’t stuck at all. In other cases, a broken hose causes the brakes to feel the same as before the hose broke. Perform a thorough investigation to identify the source of the problem.
An issue with the rear caliper may sign that you are not following the servicing method correctly. It’s important to remember that the rear calipers work differently from the front ones. Compressing them necessitates following the proper procedures. Rear calipers just cannot be pushed back in. To begin, they must be simultaneously rotated and pressed. The rear caliper pistons may be operated with ease using a wind-back tool. You’ll likely need a diagnostic instrument to rewind an electronic parking brake.
Do I Need a Brake Caliper Tool?
Yes, you need a brake caliper tool. In addition, special tools are required for pressing the brake piston so you may readily replace the brake pads.
Brake pads don’t have a good lifespan. The pads in a disc braking system wear down a tiny bit when they contact the spinning rotor. As a result, these braking elements (the pads) gradually get thinner and thinner over time. Because of this, the caliper piston emerges from the hollow cylinder in which it is housed. As a result, the worn-out brake pads are pushed into the rotor even further. It eventually has to be replaced with new, unused brake pads. Changing the brake pads is a pain because the caliper piston is nearly wholly extended. Pushing the piston back into the caliper is the only option.
Special brake pad tools come in handy in this situation. A brake caliper tool retracts one or more pistons back into the caliper to remove and replace brake pads without difficulty. Because the piston is threaded like a screw, you cannot simply push it back into the caliper. Instead, it must be twisted around. Using a set of pliers, for example, would work, but it’s not recommended. The piston, the caliper, and your hands might all be damaged. In most cases, the brake caliper tool has a handle on the other end that you can spin over the piston. The piston is coiled back into the caliper as it revolves.
Stagnant caliper pins necessitate maintenance on the floating variety. Dust or corrosion might cause this. Friction continues to build even while the brake pedal is not being pressed since when this happens, the caliper cannot correctly retract the brake pad from the braking rotor. Using too much gasoline and causing the rotor to deform can increase pad wear and decrease in fuel economy. The description of a brake caliper we’ve given thus far doesn’t cover all models. As we’ll see in the following pages, there are a variety of specialist calipers available, each with its own unique set of features.
How to Release Brake Caliper Pressure?
To release the brake caliper pressure, you must: Lift the car and remove the wheels> Remove the caliper & brake pads > Compress the brake caliper piston using special tools > Reassemble everything.
Place the vehicle safely on jack stands rated for your automobile and raise the wheels to a comfortable height. Check your owner’s handbook if you don’t know where your car’s jacking points are. Once you’ve removed the lug nuts keeping your wheel in place, you’ll have access to the brake caliper underneath.
Remove the bolts that secure your brake caliper to your vehicle. In most cases, there are just two of them, and they’re facing you. Brake fluid may leak, and air will enter your system if you remove the bolt keeping your brake line in place, so be careful not to do it. When the nuts are removed, the caliper should come out quickly. Hold your caliper with a hanger so that it does not pull on the brake hose. Next, remove the brake pads from the caliper, but keep them close at hand for emergencies. You should see a massive ring within the caliper, which is the piston that you’ll compress later.
Because you don’t want to be scrambling for tools later, we’ll have everything ready to compress your piston at this stage. First, place a transparent plastic brake hose over the bleeder screw on the brake caliper. Then, using a glass container, put the other end of the cable. Any soiled brake fluid is sucked into this reservoir whenever the piston is pressured.
As tempting as it may be to omit the hose and bottle, I strongly advise against it. A tiny quantity of brake fluid may destroy paint, cause skin irritation, or even harm animals and children. Afterward, locate a caliper bleeder screw socket or wrench. Just have the wrench nearby if you need to undo it right away. Finally, reinstall one of the old brake pads into the caliper, ensuring that the piston is directly in contact. Because it’s merely used to push the piston, there’s no need to get it exactly where it needs to be. Lastly, and maybe most critically, the brake caliper piston has to be compressed!
You should follow your compressor tool’s instructions if you use it. Place the fixed jaw on the back of the caliper if you’re using a G or C clamp. Tighten the movable jaw until it just contacts the brake pad protecting the piston. Take your wrench and release the caliper bleeder screw now that everything is in place.
It’s OK if you don’t remove it all the way. Place the caliper with the bleeder screw pointing up to prevent air from entering the brake fluid. The piston should now fall back into the caliper as you carefully tighten your compression tool, allowing brake fluid to flow into your bottle. To remove the compressor tool, tighten its bleeder screw and the piston. Try to fit the caliper over the brake rotor now that you have fresh brake pads in the caliper.
Now that the piston has been compressed and the brake pads have been fitted, it’s time to put the brake caliper back together with the way you took it out. Once the new brake pads are installed, you’re ready to go, and the caliper bolts are tightened. The brake pedal should be firm, and there should be no air in the brake fluid as a precautionary measure. You’re done! Remove the jack stands, then lower your vehicle to the ground. Slowly check your brakes for unusual noises or sensations.
Different Methods to Relieve Brake Pressure?
There are two methods to relieve brake pressure: Push-tye caliper pressure & screw type caliper piston.
It is the simplest form, and, fortunately, it’s the most popular. First, the bleeder screw is opened, the piston is pushed back into the caliper, and the bleeder screw is closed. We will provide step-by-step instructions for this sort of problem below. Despite its rarity, it’s crucial to know how to relieve the pressure on a caliper piston if your vehicle has one, rather than pressing the piston back into the caliper. The piston does have a screw-like thread and is meant to be twisted clockwise to return the caliper to its original position.
You’ll need a specialized tool known as a “caliper piston wind back tool to reinstall the piston.” Just insert a 3/8-inch ratchet into the cube and tighten it like a bolt or screw, utilizing a pattern of pins that suit the holes in your screw-type caliper piston. You’ll slowly but surely watch the piston move back into its caliper. If the piston face of your caliper has several 1/8-inch holes, it utilizes this type of piston. If this is the case, you’ll need a brake caliper pressure to release the wind back tool, which you may go to the auto parts store.
Anyone with simple tools and mechanical knowledge may learn how to release brake caliper pressure in minutes. However, it’s essential to prevent several typical blunders, like unscrewing the brake hose bolt or leaving the bleeder screw exposed while raising your vehicle. Avoid these mistakes whenever possible. With patience and prudence, I’m convinced that you’ll be successful. If you follow the methods outlined above, you’ll save money, increase your DIY skills, and gain more confidence.
What is the cost of a sized fixed caliper?
$250 – $500 is the cost of a sized fixed caliper. The parts range in price from $100 to $300, while labor costs might reach $150 to $200.
You may be able to avoid replacing the caliper if you use one of our suggestions to compress it. Unfortunately, there is no one-size-fits-all answer. The problem may be the brake hose, which is generating the same symptoms as the caliper piston. If you change the brake caliper, between $250 and $500 may be required. The parts range in price from $100 to $300, while labor costs might reach $150 to $200.
Costs vary depending on the kind and model of your car and the wages in your area. It’s possible to save a little money on labor by replacing the brake caliper yourself, but you’ll still have to pay for the item outright. You may occasionally restore the caliper with a new piston and seals, but it’s frequently more convenient and less expensive to acquire a new one. You can use drum brakes on older automobiles and trucks, which work by slowing the rotation of the wheels by friction with the drum’s revolving shoes.
When heat and gases accumulate inside the drum due to friction, a condition is known as “brake fade” occurs. In contrast to drum brakes, which have their brake pads embedded within the drum, brake pads in disc braking systems are located externally to the disc, making it easier for heat to escape. However, since they are less effective at stopping a vehicle with less stopping force, most automobiles today employ disc brakes instead of the more common and less expensive drum brakes.
How Do You Retract a Brake Piston?
Yes, you can retract a brake piston. But, first, have the right tools > Get the caliper ready > Compress the piston via the special tools > finish the work.
When working on the disc brakes, you’ll need a few more tools in addition to the standard ones you’d use for routine vehicle maintenance. One of the “C” clamps is a medium-sized one. You may require an 8-inch clamp to fit huge cars with giant brakes, but a 6-inch clamp should be enough for most automobiles. Having a can of non-chlorinated brake cleaner on hand is a good idea if you need to remove excess soil from the rotor. In addition, you’ll need a couple of thick, clean clothes to clean up with.
Ensure you have the right tool to remove the caliper bolts once the car has been elevated. Torx head wrenches or other specific tools may be required. The caliper should simply fall off the rotor when the fasteners are removed. Brake hydraulic lines will still keep the caliper linked to the vehicle, even after the mounting nuts have been removed from the caliper. Under no circumstances should this be loosened or removed. Compress the piston at this point.
Finding the piston after removing the caliper should be simple after removing it, which has a “C” form and a round section on its interior surface. It is typically fashioned like a can that has been emptied. Make sure the piston is in good working order first. Ensure no hydraulic fluid is seeping from the seal surrounding the piston’s outer surface. If required, remove any more dirt from the area around the piston and clean the piston’s exterior surface.
Put one of the rags into the piston cup and then slip the clamp around the caliper’s outer surface, with an adjustable side of the clamp sitting within the piston chamber, as shown in the image below. Make sure the piston is not being pushed at an angle when you carefully tighten up the clamp once installed. After a certain amount of pressure is applied, it should retract back into the caliper housing until it reaches its entire range of motion. Once the piston has been rejected, you may now fit the new pads or rotors and finish your brake service.
Should You Open Bleeder Valve to Compress Piston?
You don’t have to open the bled valve to compress the piston.
You must open the bleeder valve to compress the caliper piston from an expert’s perspective. Without bleeding your brake caliper, you should not pressure it. There’s a good chance that the caliper’s braking fluid will become tainted if the bleeder valve is not opened. If you squeeze the caliper piston without releasing the bleeder valve, the ABS sensor is also in danger of being damaged. In my opinion, this is a risk that you should not take.
The sole purpose of a bleed valve is to stop the flow of fluid or air in a system. Bleed valves are commonly employed in many industrial applications, such as pipe networks and gas turbines. Because you will limit the bleed valve’s input, you will slow the flow of air or liquid. The bleed valve’s primary function is to isolate the system, but it can also interfere with its operation.
The bleed valve has a maximum speed at which it may remain open. It means that bleed valves can prevent dangerous gases from being released into the environment when used in industrial operations to achieve tight shut-off or isolation. For example, compressor bleed valves protect the axial compressor against surges and stalls at the start and stop of the process in various industries. It is also possible to transfer liquid or air through one system to another using bleed valves.
How to Get Seized Pistons Out of Brake Calipers?
To get the seized pistons out of the brake calipers, drain the brake fluid using the blowgun, then shoot the air pressure into the brake hose hole.
Whether or whether it’s “seized” is a matter of degree. Take one of the ears out of the dust boot and clamp it to a bench vise to evaluate how severe the condition is. A small amount of brake fluid dripping on the caliper’s piston wall may remove the rust. Return the boot to its original position. Make sure you don’t rip or pinch the dust boot when you grasp hold of the piston lip with a set of slip-joint pliers. Then attempt spinning the piston. You can probably get it out if you can get it to turn. To see if it helps, try rotating the piston a few times.
Put a wad of rags close to the piston when it feels loose enough. The fun begins now. Use your blowgun’s rubber tip to force air into your brake line’s hole after closing the bleeder screw. To ensure a tight seal, you’ll need to shove the blowgun firmly into the opening. The pressure of the air should pop the piston out. The rags will act as a buffer, preventing the caliper from cracking. Alternatively, you may flush out the brake fluid, ensure the bleeder screw is closed, cover up the brake hose hole, and return it in its original packaging for a core fee.
How to Twist Caliper Piston without Tool?
To twist the caliper piston without a tool, use a proper adaptor. Then, using the adapter, twist the two points on the tool until the piston is engaged.
If your caliper has two wires or hoses linked to it, it applies both the service brakes (when you press the brake pedal) and the parking/emergency brake. The hydraulic line (blue arrow) or the brake cable (orange arrow) (red arrow). The caliper’s piston includes two notches to make it easier to force it back in a while, twisting it.
If you need to service a wide variety of vehicles, this Astro Pneumatic Tool PN 78618 adaptor set is for you. Previously, I owned the Snap-On PN YA8610B toolset, but I loaned it out to a coworker and never received it back. The AP set comes with both left- and right-handed screws, which is nice. Although I’ve primarily utilized right-hand thread on this car, certain Fords and I’m sure other vehicles have left-hand thread pistons.
Using the appropriate adapter, turn the two pins on the tool clockwise until the piston is engaged with the notches on the pins. As long as you maintain the backing plate (arrow) in place, you’ll be done in no time at all with this process—a precisely compressed caliper piston. The rear of the brake pad is often a little pin when using these unique brake calipers. Make sure the brake pad pin slides into the caliper piston slot before you remove the piston with your tool. A standard brake assembly follows from this point on.
Do I Have to Bleed the Brakes to Compress the Piston?
You don’t have to bleed the brakes to compress the piston. If your brake pads are completely damaged, you can bleed the brakes, but the experts do not advise it.
Many professionals recommend Bleeding the braking system when it comes to maintaining your brakes. Bleeding the brakes is necessary to ensure that no air is left in the system. Until the brakes are bled, air will remain in the system. Hydraulic pressure is needed to keep the brake pads in place on the rotor. Your car’s braking performance will suffer from air bubbles in the hydraulic fluid. Bleeding your brakes is a good idea as a preventative measure.
It’s simple to bleed non-ABS braking systems. As long as no air has gotten into the ABS modulator, bleeding many ABS brake systems is a piece of cake. It is possible to bleed specific braking systems with air in the ABS modulator. In some cases, you may need the help of a mechanic or dealer to perform the bleed of the brakes. Whether or not your ABS requires a scan tool to be bled: The ABS modulator valves may be cycled using a scan tool. Bleeding the braking system is possible if the valves are explicitly arranged. Without a scan tool, it’s impossible to bleed some brake systems.
Some manufacturers don’t require brake fluid flushing, but most mechanics do. New brake fluid is substituted for the old in this precautionary step. Over time, brake fluid becomes contaminated with water, which can cause damage to the components of the brake system. Therefore, it’s a good idea to perform a brake fluid cleanse every time you swap out the rotors.
How Do You Compress a Brake Caliper With a Screwdriver?
To compress the brake caliper with a screwdriver, you must lower the driver until the force on it is balanced out.
In many cases, simple hand tools are all that are required to compress a caliper piston. You might be able to get by just fine with a standard screwdriver. Put a screwdriver in the caliper window and tighten it up. You must keep your grip on it while squeezing it into the spaces. The screwdriver must be lowered until the forces acting on it are balanced.
The brake piston should retract somewhat as a result of the pulling motion. Pull the screwdriver back slightly once it’s been inserted. Outward motion is what you’re looking for while applying pressure. You may now insert a screwdriver between the piston and the brake pad. Push the piston with a gradual movement from here.
What Happens if You Don’t Compress Calipers?
If you don’t compress the caliper: your vehicle will stop running smoothly.
Acknowledge the following steps to compress the calipers-
- Remove the caliper
- loosen the caliper bolt
- Remove the caliper.
- Make sure the brake pad fits snugly in front of the piston
- Then secure it in place with the channel lock when you’ve finished adjusting it.
- The caliper and brake pad should be positioned between the grips of your channel locks, or you should place the caliper and pad behind the grips.
- Once the piston has been effectively pulled inward, carefully but firmly squeeze the channel lock to compress the piston back into its original position.
Why won’t My Caliper Piston Go Back?
Due to corrosion, brake dust, and damaged brake hose your Caliper Piston Go Back.
When the brake pads contact the rotors, they produce dust and soot, clogging the pistons. The answer to this problem is as easy as cleaning the dust from the brake caliper pistons with a soft brush or a clean cloth. To force them back into place, you may need to use a clamp with little pressure. Be aware that the brake caliper pistons at the front & rear each have a unique mechanism. It is an important consideration. Wind-back tools are used to spin and push in the rear pistons simultaneously.
A deteriorated brake hose might also prevent the reinstallation of a brake piston caliper. The pressurized braking fluid puts a lot of strain on brake hoses, and as a result, they begin to break down internally over time. If the fluid level in the reservoir does not rise after applying pressure to the piston with a screwdriver, the bleeder valve has to be loosened. If the brake fluid comes out from the valve and the piston starts moving when pressure is applied to the piston with a screwdriver, the brake line has decomposed. You should replace brake hoses on both sides because they are likely to have deteriorated over time.
Corrosion is a common enemy in automobiles, and it may even cause brake pistons to freeze. Because brake fluid is hygroscopic, it may soak up a lot of moisture from the air and corrode and freeze the system’s internal components over time. As a result, brake fluid should be changed at least every 50,000 kilometers or three years, and you should use only the approved brand of brake fluid.
How Do You Free a Stuck Caliper Piston?
To free the stuck caliper piston: Inspect the parts> Bleed the fluid > Check the push rod > free the caliper piston.
To begin removing the stuck caliper, make sure all of the components around it are in the right places. You’ll want to inspect the caliper piston, hose & line, master cylinder fluid, and the brake line connector. Next, you must drain the brake fluid. Begin by opening the bleed valve, then drain the brake fluid. Vacuum, pressure, or gravity can all be used to get rid of the fluid.
The bleed valve should be closed after you’ve filled the system. You should also check the push rod’s length. The brake caliper might freeze if it’s left for too long. Remove the rod and trim it to the proper size if this is the case. Ideally, you should use the vehicle’s standard pushrod to replace the rod.
We utilize our braking system regularly. However, it receives little attention. Preventing future occurrences of this problem is as simple as routine maintenance on the vehicle’s braking system. First, you should check to see if any parts have broken down. Any symptoms of corrosion can also be seen here.
Next, you should constantly remember to keep the brake system adequately lubricated to guarantee a smooth operation. Brake oil should not be of inferior quality, either. The sliding pins and the pitons will benefit from the lubrication and protection provided by high-quality oil. You should also avoid abandoning your vehicle for an extended length of time. Even if you just use it once, do so to prevent this issue.
How Do You Know if Your Rear Calipers are Bad?
Vehicle pulls to one side, Braking high-pitched squealing, Metallic Rubbing Noises, Unevenly wear down, clunking sound, leaking bread fluid are some hints if your rear calipers are bad.
Does it feel like the automobile is pulling or veering to one side when you’re driving? In and out movement of pistons is caused by hydraulic pressure exerted on the master cylinder by the brake pedals. The brake pads will either not release the rotor or will not make contact with the rotor if debris or rust causes the pistons to freeze. When a caliper is damaged, the automobile will begin to veer toward that roadside. The car will move away from the injured side if the brake pad does not contact the rotor. It might happen when you apply the brakes or even while the car is running normally.
Brake calipers stuck or frozen might make noises when they’re damaged. If the noise is coming from the brake calipers rather than the brake pads, it will be heard while driving; however, if the noise is coming from the brake pads, it will be heard when applying the brakes. If the caliper becomes frozen or jammed, it might cause the brakes to lock up entirely, so have the car towed to an auto repair shop as soon as possible.
If one side of the vehicle’s brake pads appears to be thinner than the other, the braking caliper may blame. You should take the car to a mechanic to check it out by a professional. Hydraulic pressure is used to operate modern braking systems. An oily patch inside the tire may indicate a faulty brake-caliper seal. However, it is possible that this isn’t the caliper after all. For accurate diagnostics and repairs, contact a professional expert.
It’s conceivable that the bracket that keeps the brake caliper in place is defective, which is a less common symptom. When a bracket breaks, it makes a loud clunking noise when the machine is running. Don’t get behind the wheel if this happens. The driver and other motorists are in danger of catastrophic harm if the brakes fail altogether. Instead, visit a Vancouver, WA auto repair shop like Ron’s Auto & RV if the vehicle needs work.
How Do You Reset a Brake Caliper Piston?
To reset a brake caliper piston, insert a flat-bladed screwdriver between the brake pads & twist to release the brakes. It will cause the pistons to return to their original position by separating the brake pads.
When installing new brake pads or bleeding the braking system, you’ll need to reset the pistons in the brake caliper. Resetting the position of the caliper pistons may be done in two ways. First, it’s best to remove the brake pads while still on the rotor. To remove the brake pads, insert a flat-bladed screwdriver between them and twist. As a result, the brake pads will be separated, and you will push the pistons back to the reset position.
How Do You Get Air Out of Your Brakes Without Bleeding?
To get the air out of the brakes without bleeding, Assemble the vehicle > locate the bleeder bolts > and remove them with the tool.
Assist Someone Else with the Brakes Get Rid of the Bleeder Bolt Bleeders should be tightened and secured to prevent them from leaking. Make sure you do this for every wheel. Next, fill the Brake Fluid Reservoir. Take a Ride in the Driver’s Seat. Remove the tire and wheel by jacking up the vehicle.
The next step is to clean the region where the brake lines are joined to the automobile using a cleaning cloth. Any oil or debris in the line may cause air bubbles to form, so be thorough while cleaning. Drying the region is necessary after removing the dirt. You can use compressed air or a clean towel.
The bleeder bolt must be located. The brake line’s lengthy cylindrical plug is what you’re looking at here. It’s a tool for releasing trapped air in brake lines. Next, you’ll need to loosen the bleeder bolt or with a tool. After that, use a wrench to attach a hose to the bleeder valve and close the brake line. Long enough tubing will allow you to stand safely away from the car.
Afterward, ask your friend to press down just on the brake pedal repeatedly. When you do this, you’ll see some fluid flow out of the line, which will allow you to replace it with fresh fluid. Next, have your friend apply constant pressure to the tubing to ensure that all of the old fluid is removed from the brake lines and gathered in the container.
Finally, it’s time for your companion to relax their grip on the pedals. Using a cleaning cloth or pressurized air, you must remove the tubing and clean the bleeder bolt. When you are through bleeding, be sure to lubricate the place where the line attaches to the vehicle so that you can tighten it quickly.
You may begin changing or adding new fluid to your brake lines now that the air has been eliminated from them. To add brake fluid, unscrew the master cylinder’s cover and slowly pour it in with a funnel while keeping the pedal down. If bubbles are present in the brake lines, it will cause pressure to build – up in the reservoir and force them out. You’re good as long as you don’t go over the maximum line.
Wait a few minutes before driving after putting new brake fluid in your master cylinder reservoir. If you drained out a lot of fluid with the tubing and the pedal, you’d need around a quart of fluid to refill the system. Make sure there aren’t any leaks by drizzling some brake fluid over the area where it connects to your vehicle. Make sure there are no leaks by wiping it down and inspecting it. You should tighten everything up until the leaks are no longer noticeable.
Then, with your friend’s aid, tighten the bleeder bolts with a wrench while checking for air bubbles in the lines. You may rest assured that there will be no more air leaks. Finally, use clutch-type clamps to secure the brake line to the vehicle. It is necessary to perform the identical procedure for each vehicle’s four wheels. You won’t be able to drive with confidence until you’ve checked the brake lines and fluid.
Last but not least, be sure to double-check all of your brake lines. Make sure there are no leaks in the lines to avoid air bubbles. When you’re done, make sure you add some brake fluid to the reservoir so that you don’t run into any issues. You can do a test drive now that your braking system has been de-inflated. After you return, check the fluid levels in your wheel cylinders. Re-inflate your brake lines if you find any air remaining in the system.
Will Air Go Way Out of Brake Lines?
No, air can’t escape from the braking system if securely sealed. Brake fluid warms quickly, and air bubbles will dissolve if pressure is relieved.
For a hydraulic system to work correctly, you must use a compressible fluid to transmit forces. A hydraulic braking system uses fluid pressure to move the caliper pistons, subsequently moving the brake pads into contact with the rotor when the brake lever is pressed. Because of the incompressibility of the brake fluid, the braking system can perform as it does. For those unfamiliar with the term, think of it as communication. The brake fluid does not degrade in quality as it travels from the liver to the caliper.
This communication is disrupted when air is introduced into the system. Because the air within is compressible, the input forces generated by applying pressure to the brake are no longer adequately communicated. Your brakes may cease working if the situation worsens, so all of your input forces are wasted. Changing the brake fluid is another reason to bleed your brakes. Brake fluid accumulates impurities from the surrounding environment over time, including dust, air, and water.
How Do I Firm Up My Brake Pedal?
Bleed your brakes, try to pump the pedal, and look for the leak to firm up the brake pedal.
Because your vehicle’s brake master cylinder cannot create the full pressure necessary for optimal braking force, you’ll experience soft brakes. Several factors might be at play, including a leak in a braking line, a lack of pressure in the master cylinder, or air injected into the system. As soon as you notice your brake pedal is spongy, your initial instinct should be to pump it swiftly. You can typically stop safely just on the side of the road even if your braking system is defective.
A recent leak or seal failure is most likely the cause of the abrupt decrease in braking pressure. The color of brake fluid can range from clear to pale yellow. Every time a line comes into contact with another piece of equipment, it’s nearly always going to leak. It is especially true for drum brakes and engines. First, look for fluid leaks under your car’s wheels and the hood to discover whether your master cylinder is wet or leaking. In most cases, the firewall is where you’ll find it.) Next, observe if the master cylinder is full to the line on the reservoir’s side, indicating that it is.
Add fluid and push the pedal to restore system pressure if low. If your brake fluid leaks, it’s a problem to be addressed right away by your local NAPA Auto Care. To eliminate any trapped air, consider bleeding your brakes if you’re in your driveway or nearby when you notice your brakes are getting soft. There doesn’t have to be a leak in your braking lines for air to be present. Your brake pedal will feel spongy if you’ve overheated the fluid in your braking system during high-speed driving or towing. As opposed to liquids, gas may be compressed.
Do I Bleed Brakes With Engine Running?
No, you must never bleed the brakes with the engine running.
With the engine off, you may bleed the brakes. An operating engine provides this increase in a vacuum. There must be no boost in the system during the bleed-out process to ensure complete air removal. Breathe out through each caliper (if provided) after pumping the brake pedal until it feels solid. With the engine off, bleed the brakes (at the calipers). It would only be the ABS pump that would be running. You’ll need to start the pump to bleed the ABS, but if you’re only bleeding the essential brakes, you don’t need to start the pump.
Conclusion
If you don’t maintain your vehicle’s braking system, it might develop a problem, increasing the danger of a severe accident. Any time you’re still unsure how to push back the brake piston without using a tool, you may come back to us, and we’ll be happy to help. One of the most crucial pieces of your car’s braking system is the caliper, vital for stopping.
These days, disc brakes are standard equipment on nearly all automobiles, at least those with four wheels. However, disc brakes are now standard equipment on many cars and trucks as well. Disc brakes use metal discs or rotors that rotate with the vehicle’s wheels. We hope you must have acknowledged everything regarding how to compress the brake piston without a tool.

He is highly regarded for his passion and dedication to continually improving vehicles in response to customer feedback.
Robert has a keen eye for sourcing the best vehicle components and materials on the market and is always looking for ways to enhance the user experience.
As a writer, Robert covers automotive-related topics.
Read more on Robert Aksamit's about page.
Contact Robert: robert@promtengine.com